
|
|
TBE Mobile User Guide |
Table of Contents
- TBE Mobile Introduction
- Setup / Configure
- TBE Mobile Basics
- Customer Relationship Management (CRM)
- Signature Capture (E-Signature)
- Vendor Managed Inventory (VMI)
TBE Mobile Introduction
TBE Mobile is a mobile version of The Business Edge which is designed to run on mobile devices like phones and tablets. tbe4mobile can be installed on iOS and Android devices. TBE Mobile is used in a web browser (chrome/safari only).
Setup / Configure
Download Information
iOS users can install tbe4mobile by searching for ” tbe4mobile” in the app store, or by clicking the following link: https://itunes.apple.com/us/app/tbe4mobile/id1181593082
Android users can install tbe4mobile by searching for ” tbe4mobile” in the play store, or by clicking the following link: https://play.google.com/store/apps/details?id=com.computerinsights.tbe4mobile
Web users can run TBE Mobile by opening google chrome or safari and loading:
https://mobile.ci-inc.com
Configure User Accounts
In order for The Business Edge users to be able to login and use the TBE Mobile app, the user accounts must first be configured by editing the user permissions via :
  9. Utilities
    10. System Administrator System
        6. Security System
           2. Enter & Edit User Permissions

|
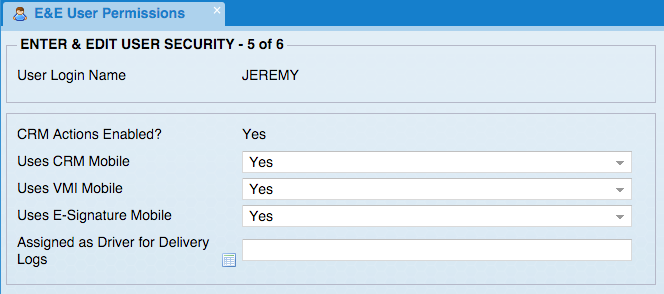
Once you have selected a user to edit, you will need to navigate to page 5 as shown below.
|
Set ” Uses CRM Mobile” to “Yes” if you would like to enable the Customer Relationship Management (CRM) functionality.
Set ” Use VMI Mobile” to “Yes” if you would like to enable the Vendor Managed Inventory (VMI) functionality.
Set ” Uses E-Signature Mobile” to “Yes” if you would like to enable Signature Capture (E-Signature) functionality.
Set ” Assigned as delivery driver for delivery logs” to the desired delivery driver.
When you are done updating the user, the system will verify that you have enough available licenses for each service. If you do not have enough licenses available to enable the service, the system will notify you, and will present you with a screen where you can quickly enable or disable the service for each user account.
Configure Web Users
The Business Edge can now be configured with ‘Web Users’ which are accounts that can login to tbe4mobile, but are limited in what customer and product data they have access to.
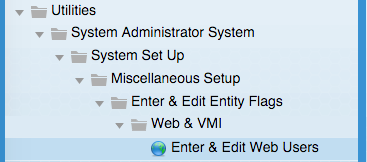
The first step in setting up a web user is to launch the menu item at :
  9. Utilities
    10. System Administrator System
        5. System Setup
            2. Miscellaneous Set Up
                3. Entity & Entity Flags
                    10. Web & VMI Flags
                         3. Enter & Edit Web Users
|
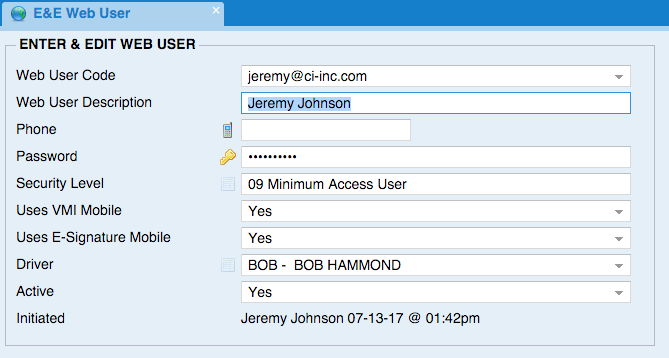
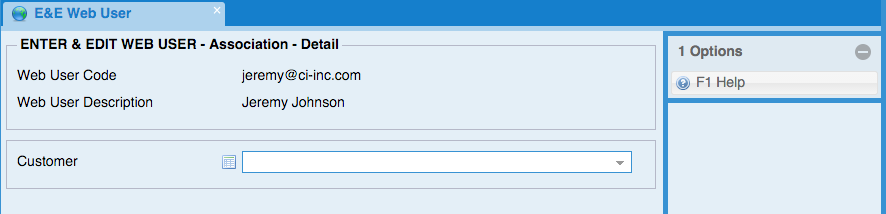
You should now see a screen similar to the screen below where you can setup your web users.
|
Web User Code must be an e-mail address.
Web User Description should be the user’s full name.
Set ‘ Use VMI Mobile’ to ‘Yes’ if you would like to enable the Vendor Managed Inventory (VMI) functionality.
Set ‘ Uses E-Signature Mobile’ to ‘Yes’ if you would like to enable Signature Capture (E-Signature) functionality.
The rest of the flags on the above screen work identically to ‘ Enter & Edit User Permissions‘.
Uses VMI Mobile and Uses E-signature Mobile both count towards the license count.
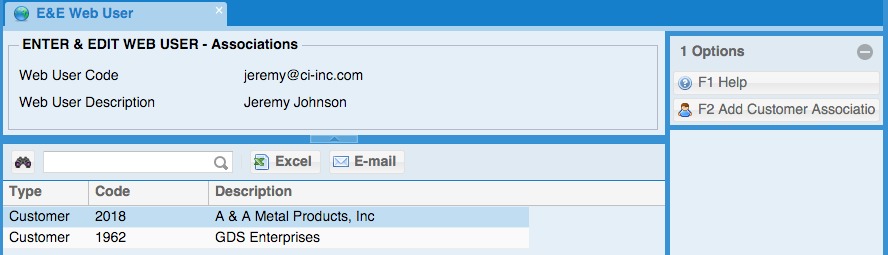
You can now edit what customer data this web user should have access to. Click the ‘Add Customer Association’ button and you will be taken to a screen where you can add a customer.
|
To add a customer, simply enter the customer code or select a customer from the list and click the ‘OK’ button.
|
Licensing Information
TBE Mobile enables The Business Edge users to use a variety of functionality which is licensed on a per-named-user basis. If you would like additional licensing information, please contact Diane Miller at diane@ci-inc.com.
Each licensed user is able to login and use TBE Mobile on up to 3 unique devices. Allowing up to 3 devices per login enables users to login from multiple devices such as a phone, tablet, or desktop computer.
TBE Mobile Basics
Login
When you first open TBE Mobile for the first time, you will be presented with a login screen. In order to login to TBE Mobile you will need need 3 pieces of information.
Host Name – This is a unique hostname for your business which you will receive from CI.
User Name – This is the same username that you use to login to The Business Edge.
Password – This is the same password that you use to login to The Business Edge.
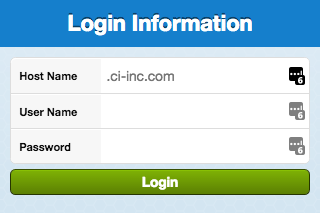
|
After you enter your hostname, username, and password, you will need to tap the “Login” button to verify your credential and login to the app. If there are any authentication or communication issues, the app will notify you of the issue.
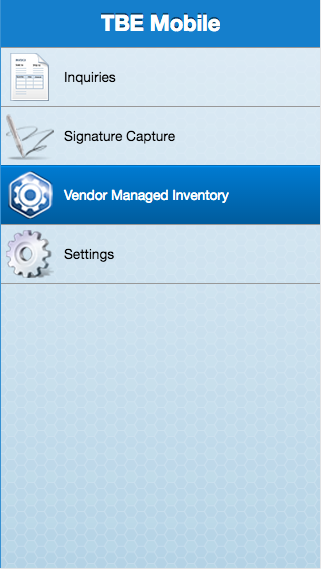
Main Menu
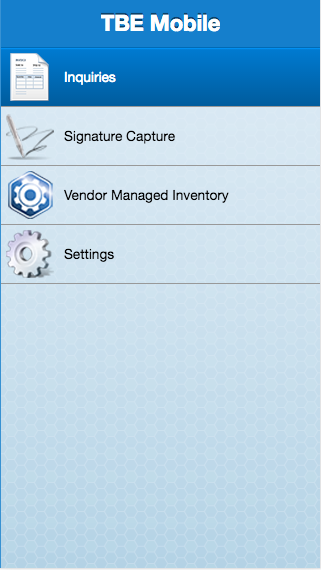
When you first login to TBE Mobile you will be presented with the main menu screen which will contain a list of items that your user account has access to.
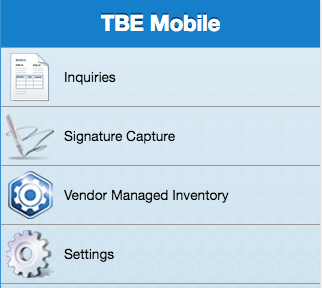
|
The ” Inquiries” menu item will appear if you have access to the Customer Relationship Management (CRM) functionality.
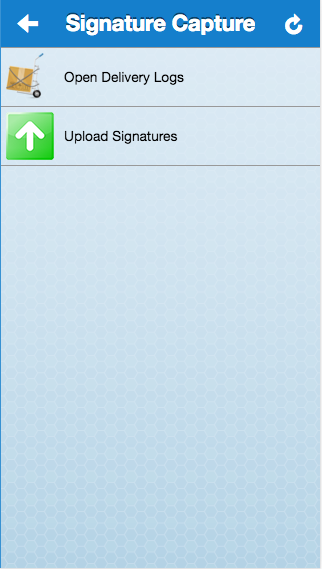
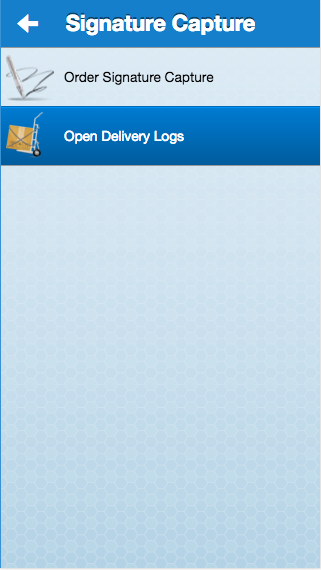
The ” Signature Capture” menu item will appear if you have access to the Signature Capture (E-Signature) functionality.
The ” Vendor Managed Inventory” menu item will appear if you have access to the Vendor Managed Inventory (VMI) functionality.
The ” Settings” menu item will always appear in your Main Menu
Settings
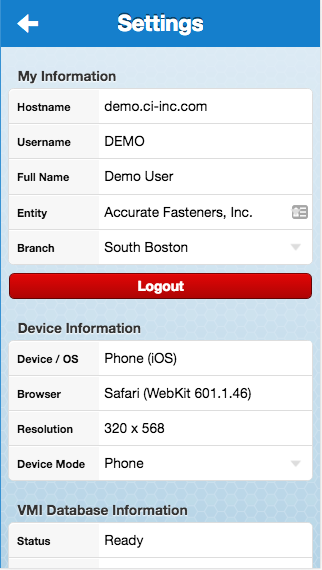
The settings screen displays 3 sections each which has information about the current session.
|

|
The ” My Information” section displays your current hostname, username, and fullname, as well as your current Entity and Branch. You can switch to a different entity or branch by tapping the “Entity” or “Branch” fields and selecting which entity or branch you would like to start using.
The ” Device Information” section displays information about the current device that the app is running on, including the device, OS, Browser, and screen resolution. There is also a ” Device Mode” option which allows you to specify which type of device mode you would like to run the app in. This option is particularly useful when running on smaller devices such as an ipad mini.
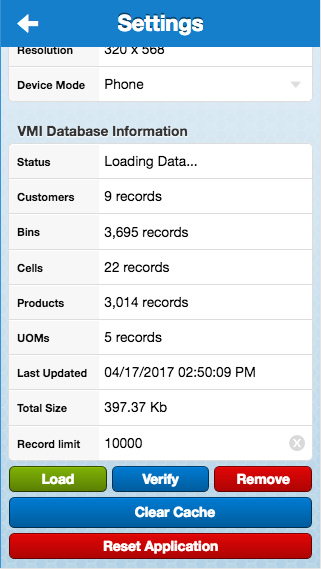
The ” VMI Database Information” section displays information about the current Vendor Managed Inventory (VMI) database, including the status, a count of how many records are in each of the various VMI tables, the last time the database was updated, the total size, as well as a ” Record Limit” field which allows you to customize how many records to load in a single request. Finally there are [ Load], [ Verify], and [ Remove] buttons which handle loading, verifying, and removing information from the VMI database.
The settings screen also contains a [ Clear Cache] button which can be used when running the app in a browser to clear the cache and restart the app fresh.
Finally, there is a [ Reset Application] button which will reset/remove all data in the application and then restart the app as if you had just installed it.
Customer Relationship Management (CRM)
CRM Introduction
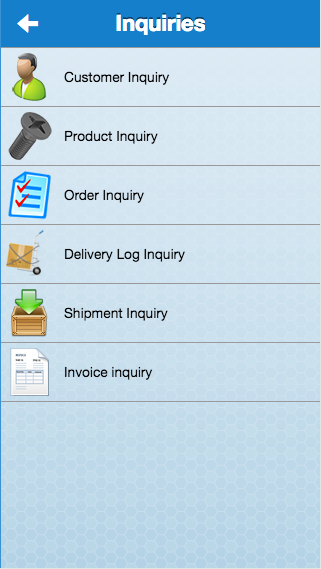
The Customer Relationship Management (CRM) functionality is available by tapping the ” Inquiries” item in the main menu. The CRM allows you to be outside of the office and lookup real-time information on customers, products, orders, invoices, shipments, and delivery logs.
The information that users see will be based on their User Security settings in The Business Edge. If you would like Salespeople to be limited to seeing only their Customers this can be setup in Enter & Edit User Permissions, Customer Salesperson Access.
|
|
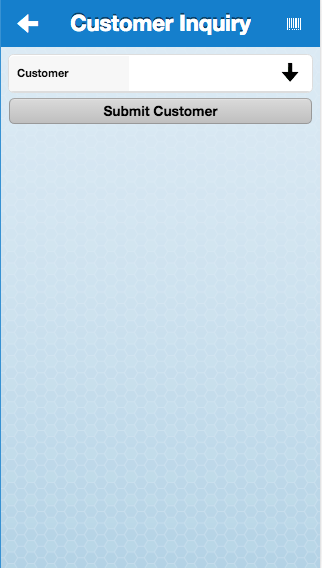
Customer Inquiry
The Customer Inquiry screen allows you to lookup all sorts of information about your customers. To get started you will first need to enter a customer name or code and tap the [ Submit Customer] button. If your search criteria returns more than one potential match, then you are presented with a list of customers to choose from.
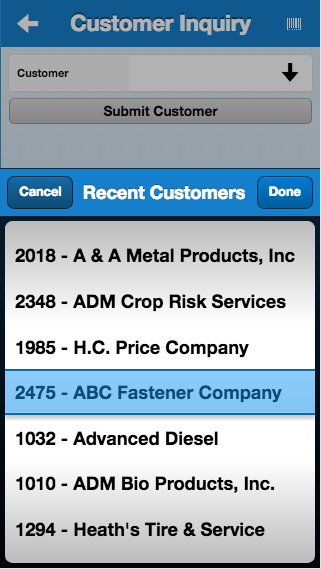
You can also tap the down arrow button in the ” Customer” field to pull up a list of recent customers, similar to how you pull up a list of recent customers in The Business Edge. Once you have highlighted the desired customer tap the [ Done] button to load that customer.
|
|
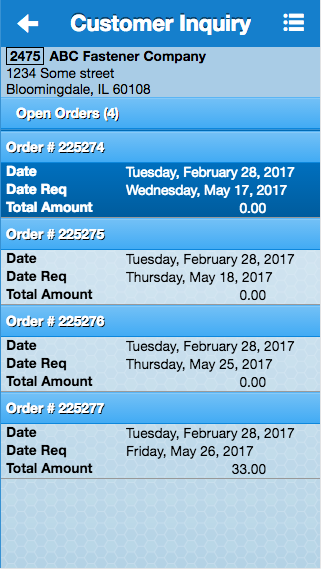
Once a customer has been selected, you will be presented with a list of open orders to browse through. You can tap any of the orders to view detailed information on that order.
|
|
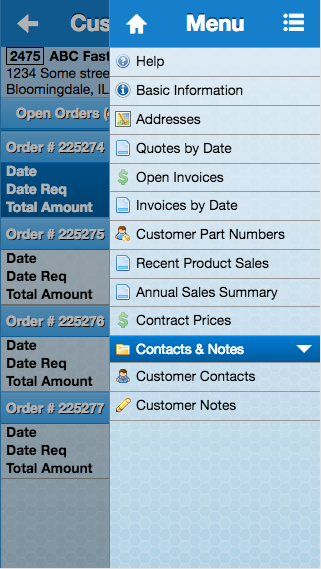
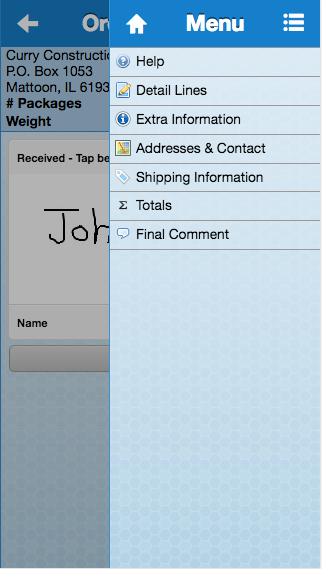
In addition to viewing a list of orders for a given customer, you are also able to see much of the same customer information that you would see in The Business Edge by tapping the menu icon in the upper right hand corner of the screen. Tapping the menu icon will present you with a list of additional information that is available for the given customer.
|
Product Inquiry
The Product Inquiry screen allows you to lookup all sorts of information about your products. To get started you will first need to enter some search criteria to identify a product and tap the [ Submit Product] button. If your search criteria returns more than one potential match, then you are presented with a list of products to choose from.
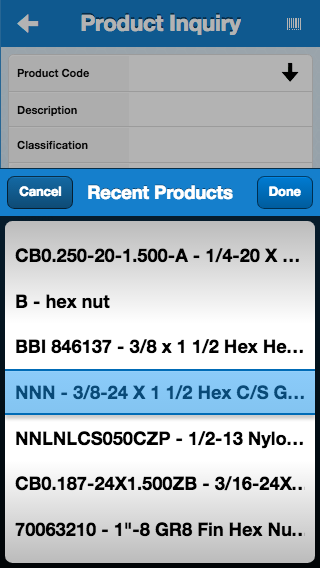
You can also tap the down arrow button in the ” Product Code” or ” Alternate” fields to pull up a list of recent products or alternates, similar to how you pull up a list of recent products in The Business Edge. Once you have highlighted the desired product tap the [ Done] button to load that product.

|
|
Once a product has been selected, you will be presented with information about the product including: availability, stocking and restocking information, price and cost, as well as 6-month usage.
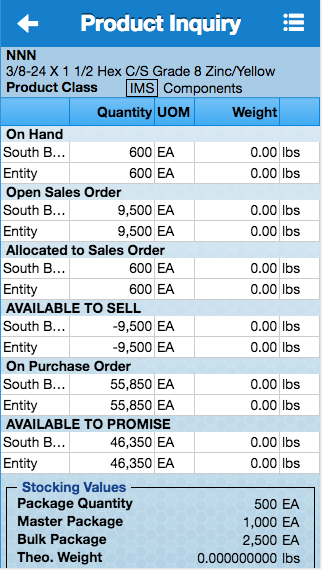
|
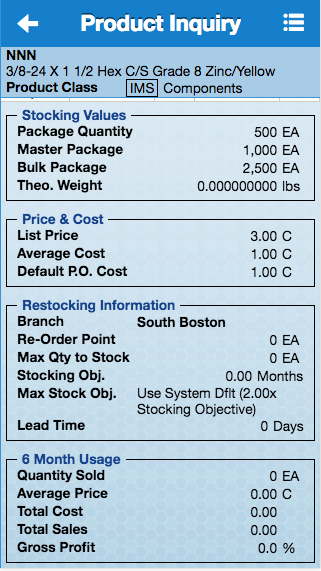
|
In addition to viewing basic information for a given product, you are also able to see much of the same product information that you would see in The Business Edge by tapping the menu icon in the upper right hand corner of the screen. tapping the menu icon will present you with a list of additional information that is available for the given product.

|
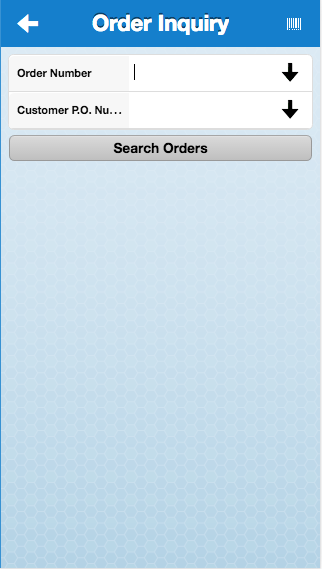
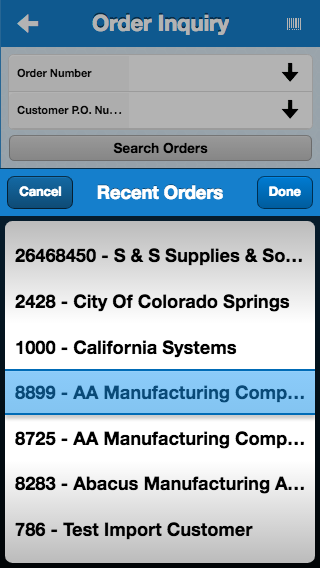
Order Inquiry
The Order Inquiry screen allows you to lookup information about a specific order. To get started you will first need to enter an order number, or a customer P.O number and tap the [ Search Orders] button.
You can also tap the down arrow button in the ” Order Number” or ” Customer P.O Number” fields to pull up a list of recent orders or customer P.O.s, similar to how you pull up a list of recent orders in The Business Edge. Once you have highlighted the desired order tap the [ Done] button to load that order.
|
|
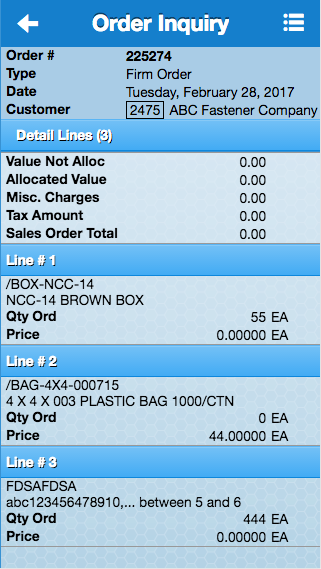
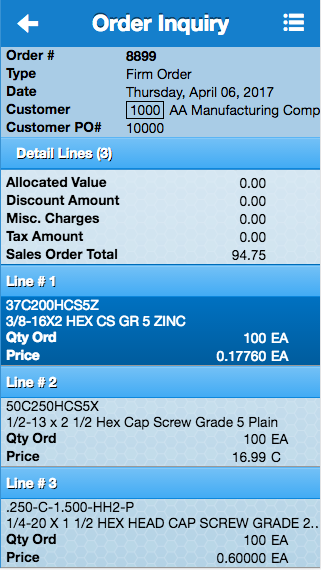
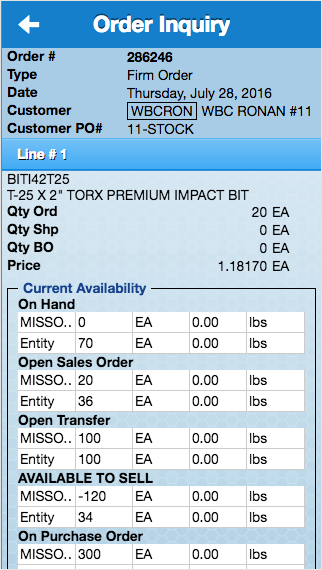
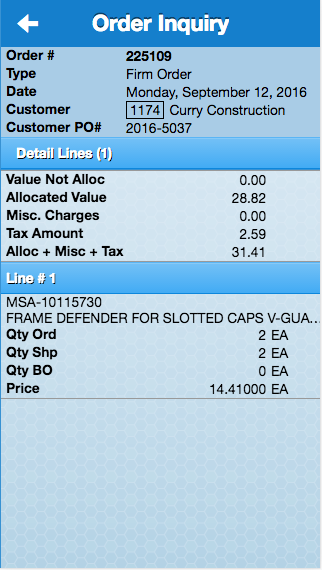
Once an order has been selected, you will be presented with the order information, including the detail lines. You can tap any of the detail lines to view detailed information on that product.
|
|
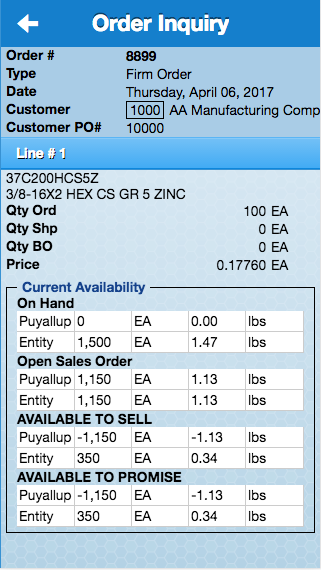
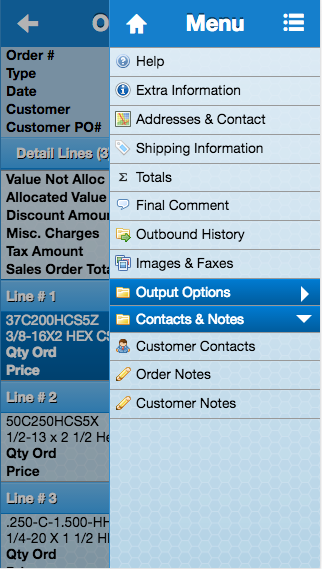
In addition to viewing order information, you are also able to see much of the same order information that you would see in The Business Edge by tapping the menu icon in the upper right hand corner of the screen. Tapping the menu icon will present you with a list of additional information that is available for the given order.
|
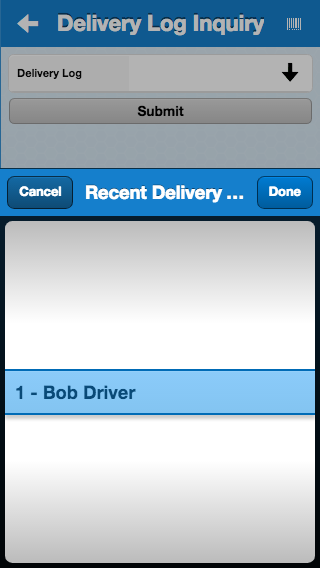
Delivery Log Inquiry
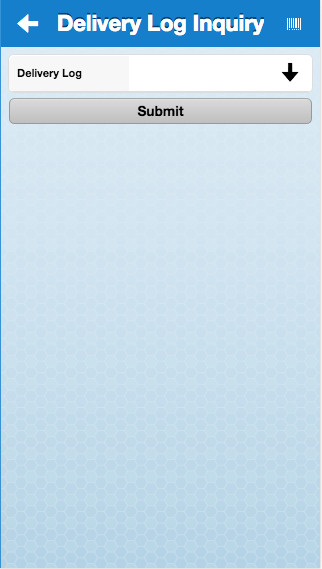
The Delivery Log Inquiry screen allows you to lookup information about a specific delivery log. To get started you will first need to enter a delivery log number and tap the [ Submit] button.
You can also tap the down arrow button in the ” Delivery Log” field to pull up a list of recent delivery logs, similar to how you pull up a list of recent delivery logs in The Business Edge. Once you have highlighted the desired delivery log tap the [ Done] button to load that delivery log.
|
|
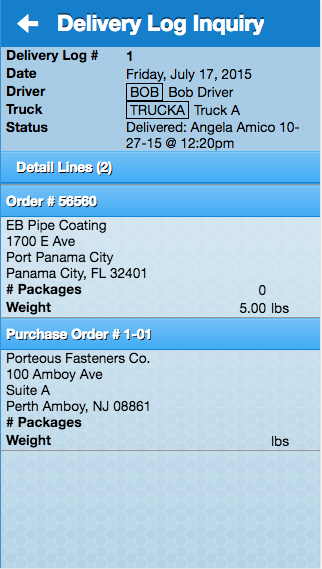
Once a delivery log has been selected, you will be presented with the delivery log information, including the detail lines.
|
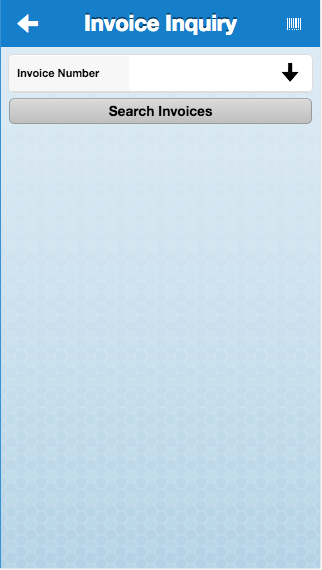
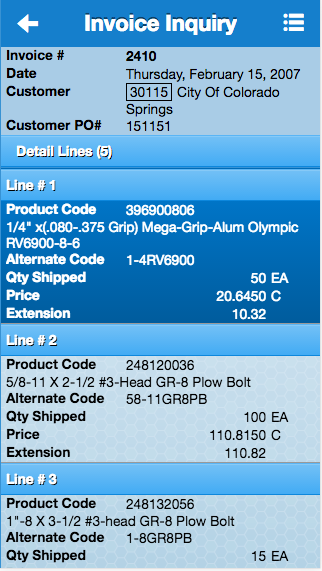
Invoice Inquiry
The invoice Inquiry screen allows you to lookup all sorts of information related to invoices. To get started you will first need to enter an invoice number and tap the [ Search Invoices] button.
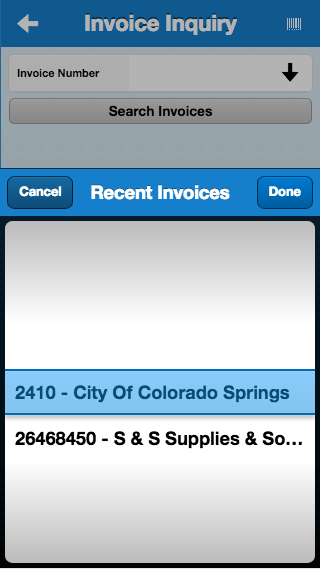
You can also tap the down arrow button in the ” Invoice Number” field to pull up a list of recent invoices, similar to how you pull up a list of recent invoices in The Business Edge. Once you have highlighted the desired invoice tap the [ Done] button to load that invoice.
|
|
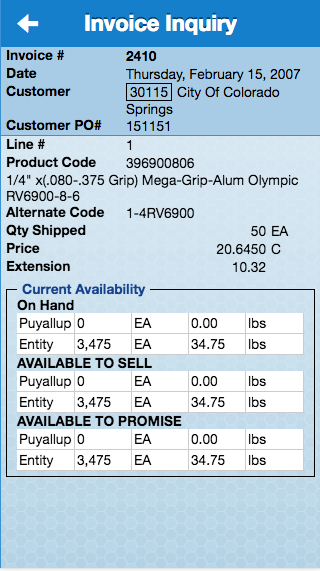
Once an invoice has been selected you will be presented with the invoice information, including the detail lines. You can tap any of the line items to view detailed information on that item.
|
|
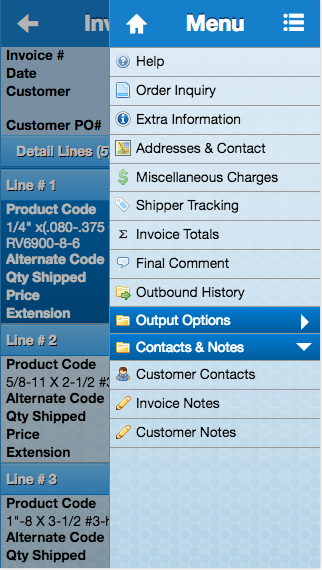
In addition to viewing detailed invoice information, you are also able to see much of the same invoice information that you would see in The Business Edge by tapping the menu icon in the upper right hand corner of the screen. tapping the menu icon will present you with a list of additional information that is available for the given invoice.
|
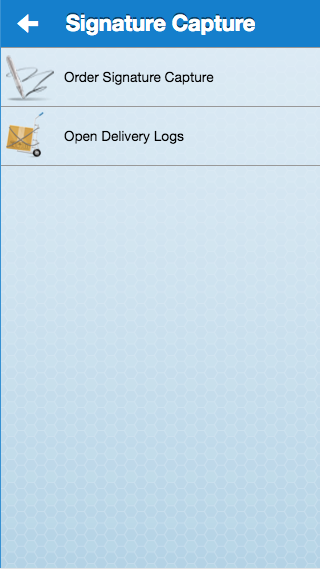
Signature Capture (E-Signature)
E-Signature Introduction
The Signature Capture (E-Signature) functionality allows you to be able to capture customer signatures on your mobile device and upload the signature data to The Business Edge.
TBE Mobile comes with both an online and offline version of Signature Capture which each work a bit differently.
|
|
| Online Signature Capture | Offline Signature Capture |
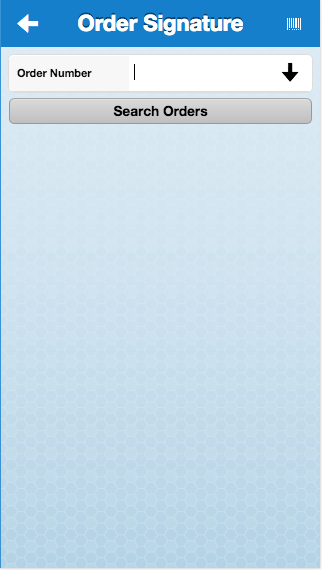
Order Signature Capture
The Order Signature Capture screen allows you to lookup order information and capture a signature from your customer. This is typically used for Counter Sales or Will Call Orders. To get started you will first need to enter an order number and tap the [ Search Orders] button.
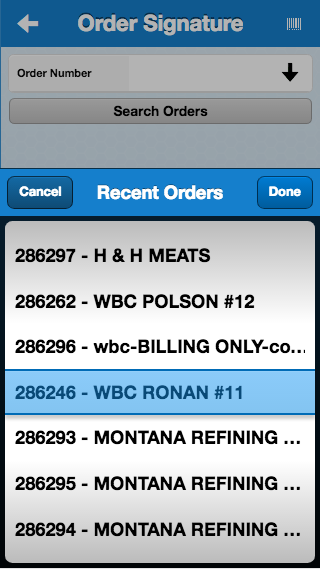
You can also tap the down arrow button in the ” Order Number” field to pull up a list of recent orders, similar to how you pull up a list of recent orders in The Business Edge. Once you have highlighted the desired order tap the [ Done] button to load that order.
|
|
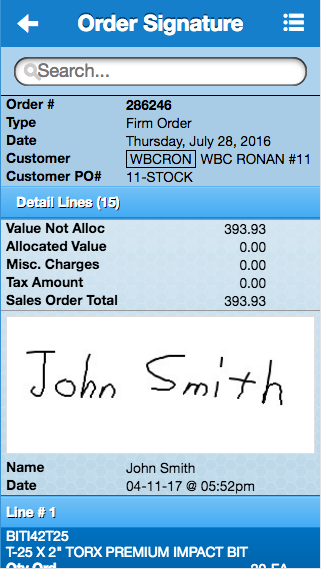
Once an order has been selected you will be presented with the basic order information.
If you already have a signature for the order, you will see the order information, including signature and detail lines. You can tap any of the detail lines to view detailed information on that product.
|
|
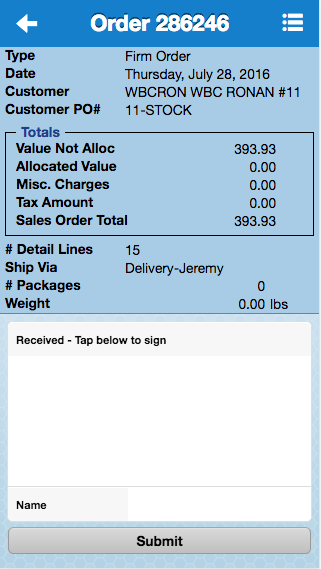
If you DO NOT already have a signature for the order, you will see the basic order information, as well as a place for the signature.
|
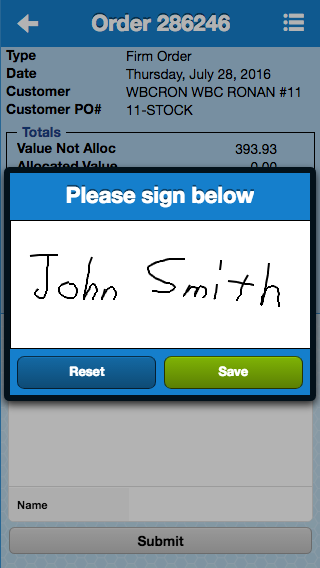
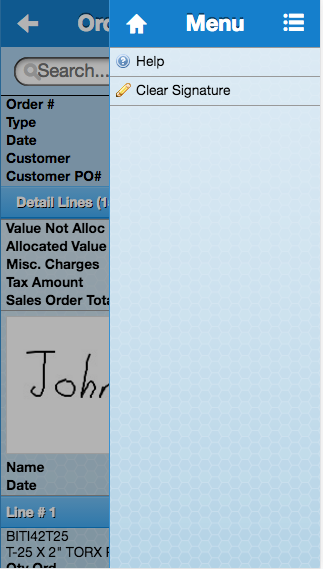
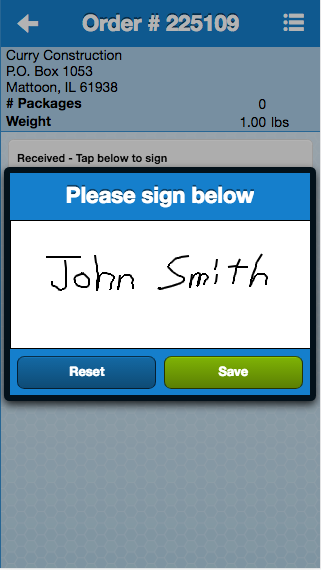
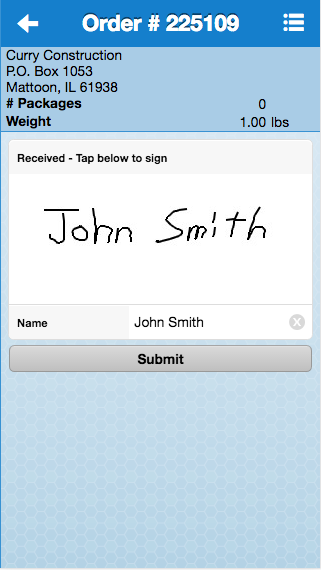
To begin signing for an order, you will tap the signature area, and a box will appear and ask you to ” Please sign below”
|
|
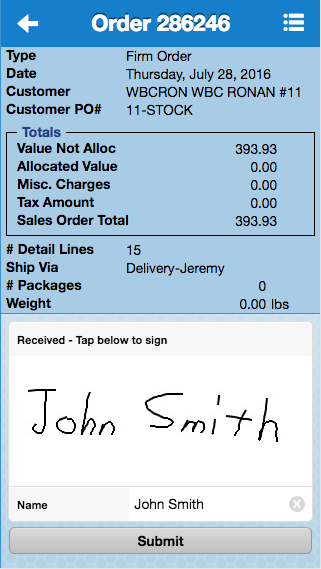
Once your customer has given you their signature you will need to tap the [ Save] button to save the signature. To complete the signature capture process, you need to enter the customer’s name in the ” Name” box, and tap the [ Submit] button.
Your customer’s signature data has been uploaded and is now available in The Business Edge.
If for some reason you need to remove or clear the customer’s signature, you can do so by tapping the menu icon in the upper right corner, and then tapping ” Clear Signature“.
|
Order Delivery System
The Order Delivery System will be used to create delivery logs for in-house drivers. Delivery log status information will be accessible in Order Inquiry.
Setup
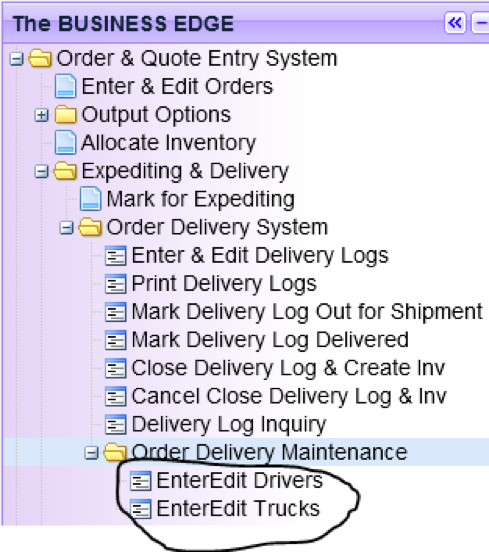
Drivers and trucks must be set up before the system can be used. They can be set up in the Order Delivery Maintenance menu.
|
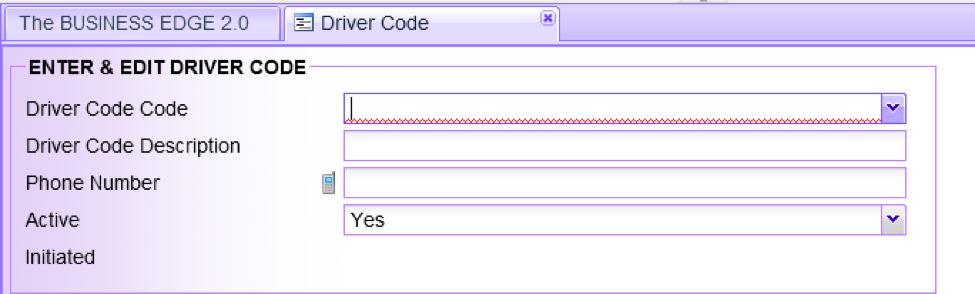
Drivers consist of a Code (ie.driver’s initials), Description (driver’s name), and Phone Number. Drivers cannot be deleted but may be de-activated so they don’t show up as a choice in the driver selection scroll box in Delivery Logs.
|
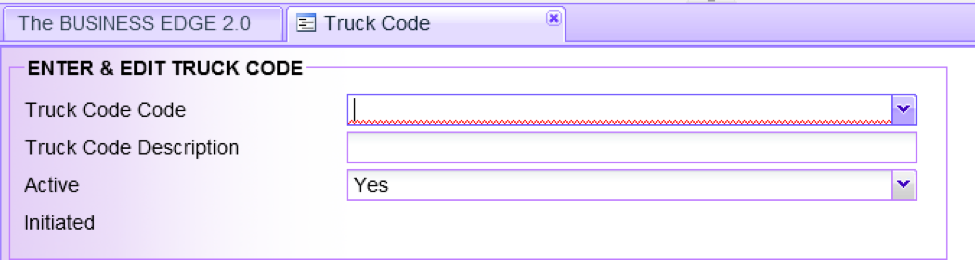
Trucks consist of a Code and Description. Trucks cannot be deleted but also may be de-activated so they don’t show up as a choice in the truck selection scroll box in Delivery Logs.
|
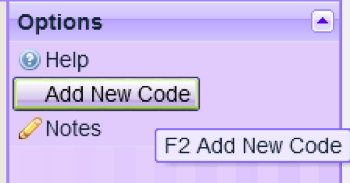
Click on Add New Code to enter a new driver or a new truck. It is recommended to decide on a standard code length beforehand – such as 3 characters for the Driver’s code (driver’s initials) and 2 characters for the Truck’s code to keep things consistent.
|
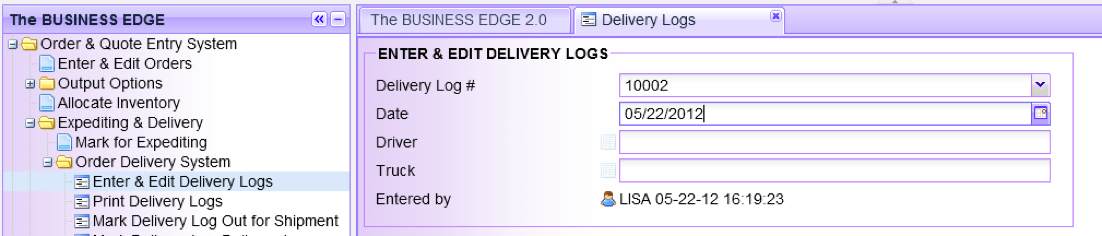
Entering Delivery Logs
|
Press enter on the Delivery Log # to create a new delivery log. The deliver log #’s start at 10000 and increment for each new log. Enter a date (default today’s date), select a driver and a truck and continue to the detail. To Edit a Delivery Log enter the delivery log #. You are only allowed to edit a delivery log if it is In Process or Out for Delivery. The system will warn you if it is Out for Delivery.
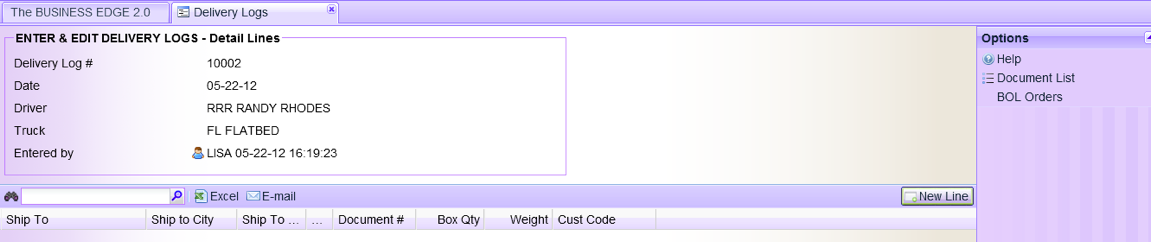
Adding Documents
|
In the detail section you will select Sales Orders or Purchase Orders to deliver. There is one way to add a PO. There are three ways to add sales orders.
1. Enter Orders or PO’s one by one by selecting New Line
|
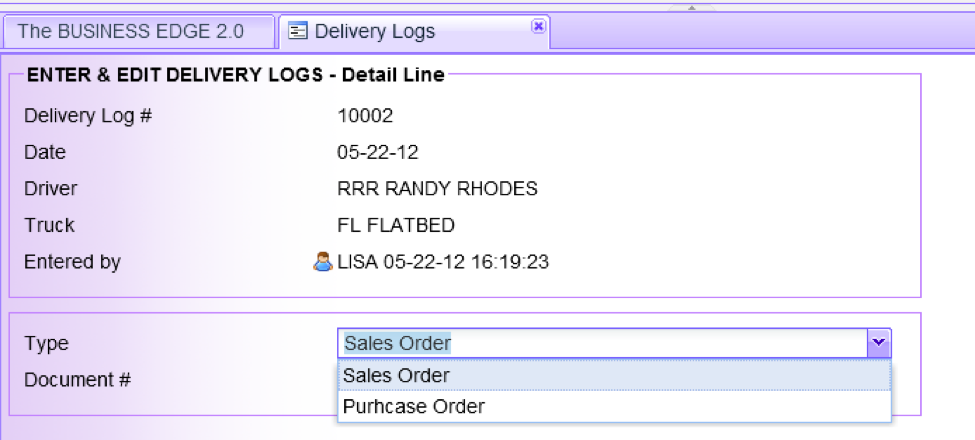
Then select the Type of document (Sales Order or Purchase Order) and enter the Document # (SO # or PO #). It will only allow you to select Sales Orders that are allocated by not invoiced. It will not allow you to select the document if it is already selected on an existing delivery log.
2. Select Orders from a list by selecting Document List.
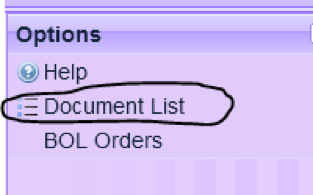
|
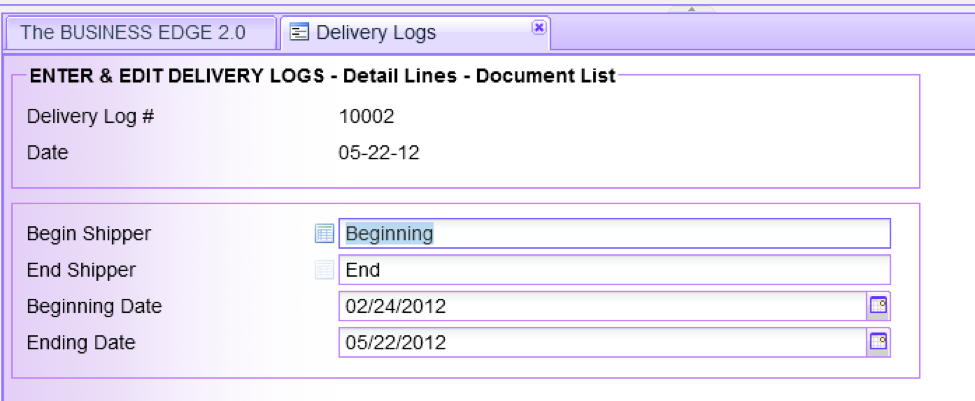
|
Select a beginning and ending shipper and date range to get a list of allocated orders available to add to the delivery log. When the list appears you can select orders by hitting the Add or Remove buttons. The order is selected to be added to the delivery log when a star appears to the left of the Ship to name. Once you’ve selected all the orders that you would like to add to the delivery log, hit Okay or escape.
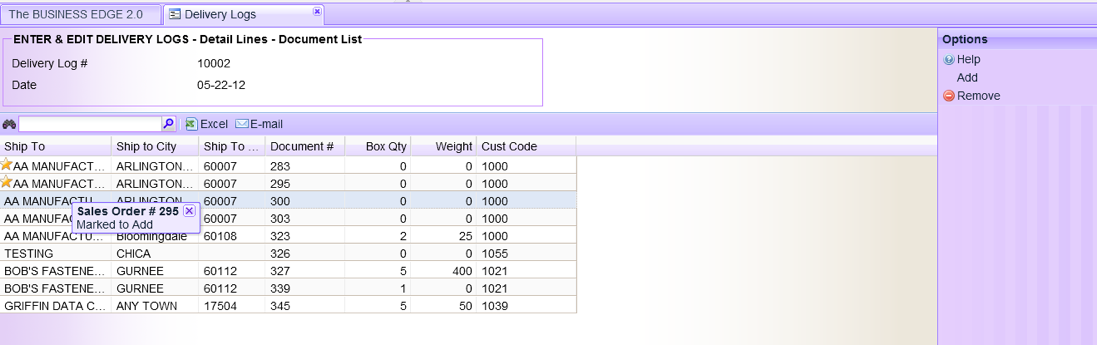
|
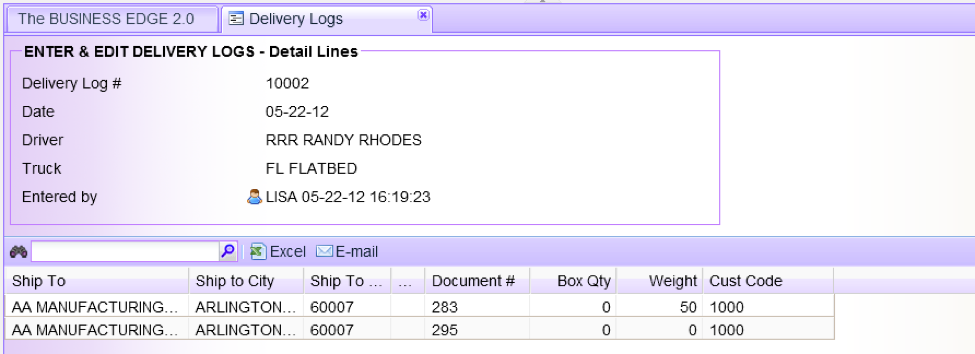
You will return to the delivery log detail screen and see the orders you selected listed:
|
3. Select Orders by Bill of Lading
Select orders from a Bill of Lading by selecting BOL Orders.
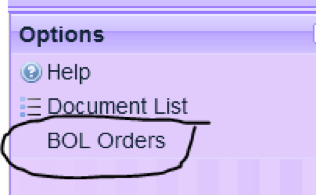
|
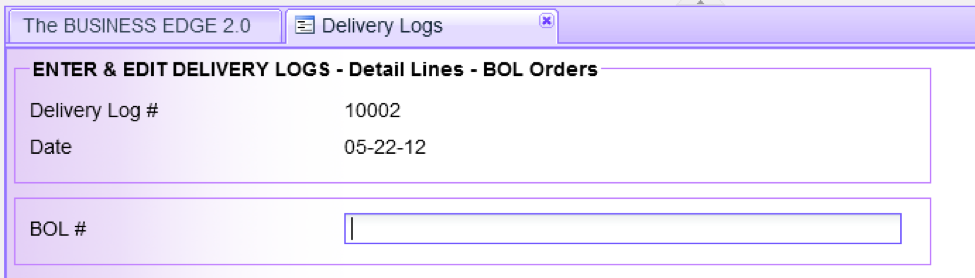
Enter a BOL number to get a list of sales orders associated with it.
|
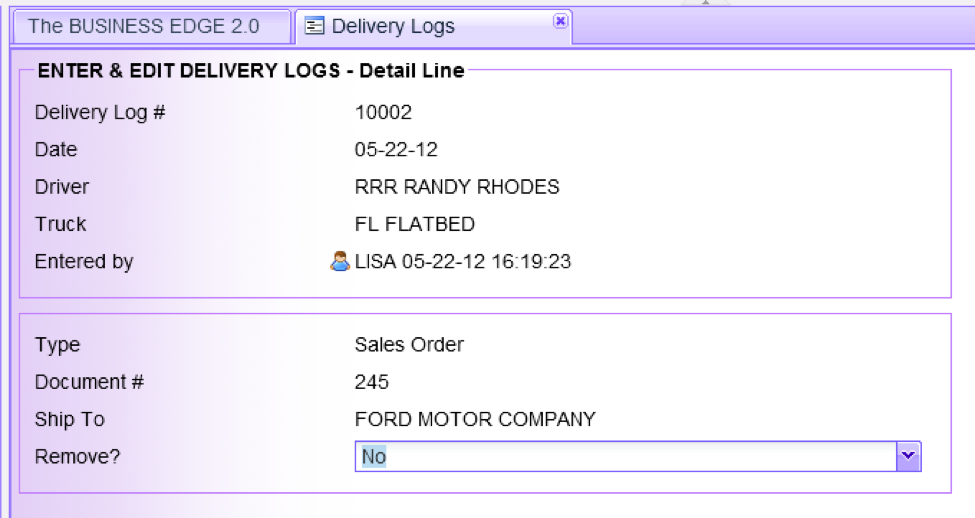
The list of orders will look similar to the Document List. When the list appears you can select orders by hitting the Add or Remove buttons. The order is selected to be added to the delivery log when a star appears to the left of the Ship to name. Once you’ve selected all the orders that you would like to add to the delivery log, hit Okay or escape.
Again, you will return to the delivery log detail screen and see the orders you selected listed.
Removing Documents
To remove a document from the list, double-click on it and you will see this screen:
|
Select Yes to remove the document from the list.
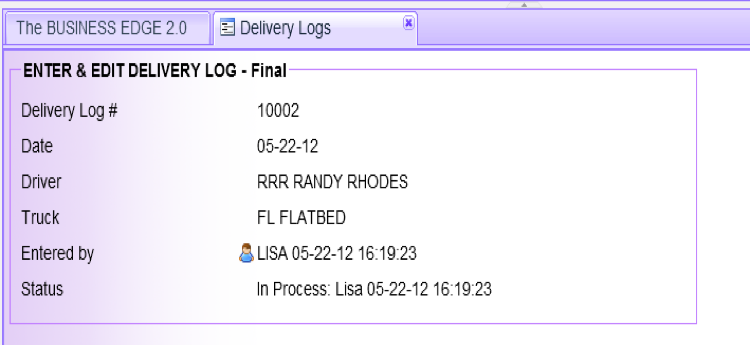
Final Screen
|
In the final screen you will have the options to go back to change the heading information or the detail lines. You can also print the delivery log and mark it out for delivery.
Delivery Log Status
There are 4 statuses for Delivery Logs:
- In Process – the delivery log is being entered or has been entered but not yet marked out for delivery
- Out for Delivery – the delivery log has been marked out for delivery – it is currently being delivered
- Delivered – the delivery log has been delivered
- Closed – the delivery log is closed it can no longer be changed
There are menu items to change the status 2-4 of delivery logs.
|
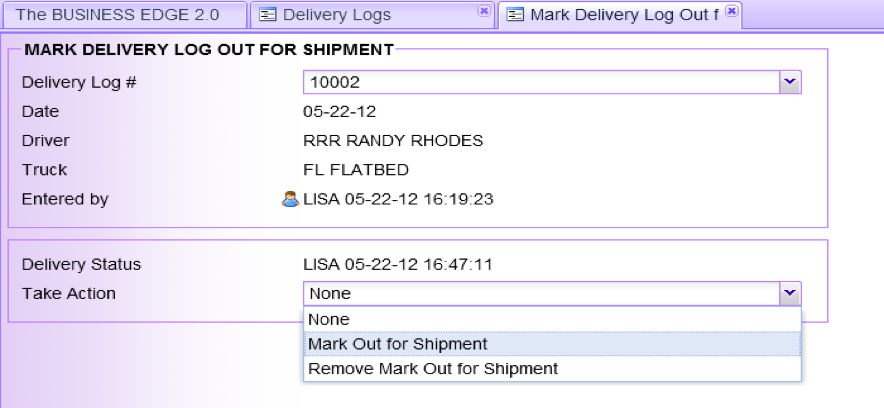
Each screen to change the status is similar. You input the Delivery Log # and under Delivery Status it will indicate the current status and under Take Action it will give you three options:
- None – this will not change the status
- Mark – this will change the status to Out for Shipment, Delivered or Closed
- Remove Mark – this will clear the status from Out for Shipment, Delivered or Closed
|
Each status is cumulative. Once the log is marked closed, you must first remove the closed stamp before you can remove the delivered or out for delivery stamps and so on.
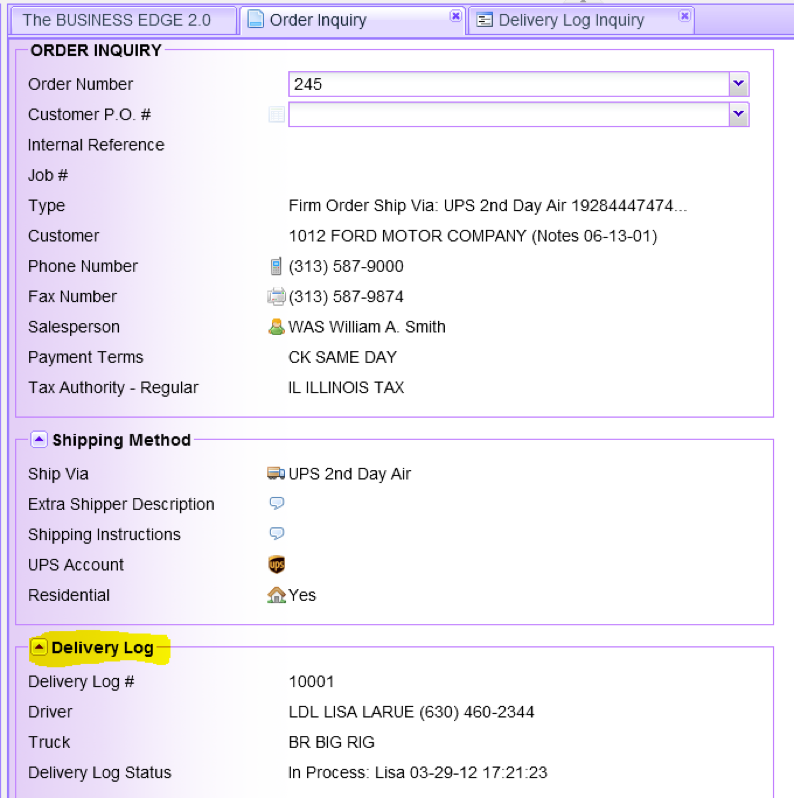
If an order is on a Delivery Log you can check it’s delivery status in Order Inquiry:
|
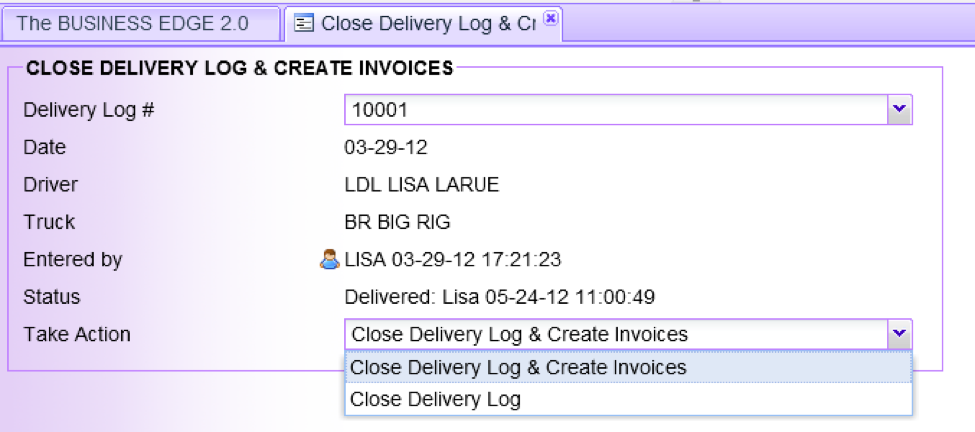
Closing the Delivery Log
There are two options when closing a delivery log, Close and Create Invoices or just Close.
|
Close Delivery Log will mark the delivery log closed. Orders will need to be manually invoiced.
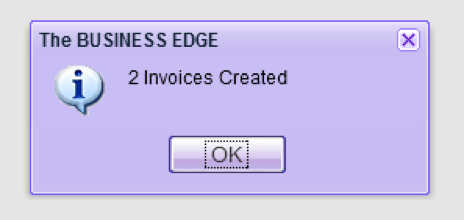
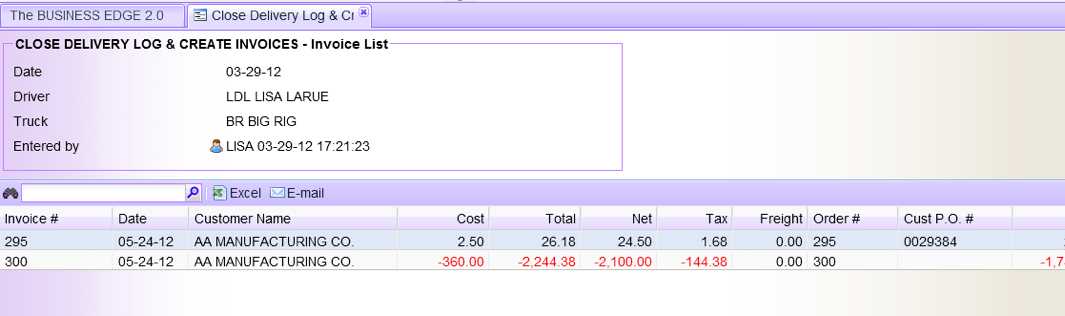
Close Delivery Log & Create Invoices will mark the delivery log closed AND create invoices for each order on the delivery log. The system will inform you how many invoices were created and then show you a list of the invoices.
|
|
The invoices are in process and will need to be printed and updated through the A/R Menu.
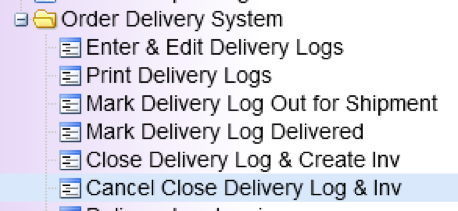
Cancelling Closed Delivery Logs
You can open the Delivery Log back up and/or cancel the invoices created in Cancel Close Deliver Log & Inv
|
|
Cancel Close Delivery Log will only remove the Closed stamp, the invoices will not be canceled (if they were created).
Cancel Close Delivery Log & Invoices will remove the Closed stamp AND cancel each order’s invoice.
Open Delivery Logs (Online)
The online version of ” Open Delivery Logs” allows delivery drivers to capture customer signatures in real-time to The Business Edge using your device’s internet connection. This menu item will only appear in the ” Signature Capture” menu if you run TBE Mobile in a browser. Currently TBE Mobile will work in both Google Chrome and Safari web browsers, and can be run by visiting https://mobile.ci-inc.com
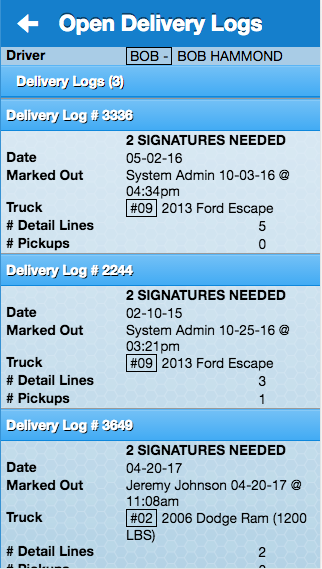
To view a list of delivery logs, you tap the ” Open Delivery Logs” menu item. The ” Open Delivery Logs” screen shows you who the delivery driver is and lists all the open delivery logs. You can see summary information for each log including how many signatures and pickups are needed for each log, as well as what delivery truck to use.
|
|
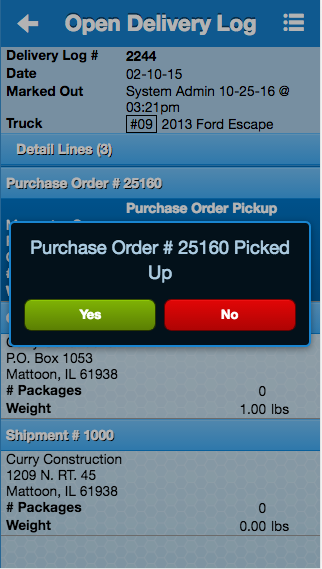
To view more details on a delivery log, you can tap the delivery log item on the ” Open Delivery Logs” screen. The ” Open Delivery Log” screen displays a list of all the deliveries for this log. To collect signatures or mark an order as picked up you tap the delivery log item in the list.
If the delivery log item is a pickup, you will be prompted to confirm that you are picking up.

|

|
If you tap an item which requires a signature, you will be prompted to collect a signature. To collect a signature you will tap the signature area and a box will appear asking you to ” Please sign below“.
|

|
Once your customer has given you their signature you will need to tap the [ Save] button to save the signature. To complete the signature capture process, you need to enter the customer’s name in the ” Name” box and tap the [ Submit] button.
Your customer’s signature data has been uploaded and is now available in The Business Edge.
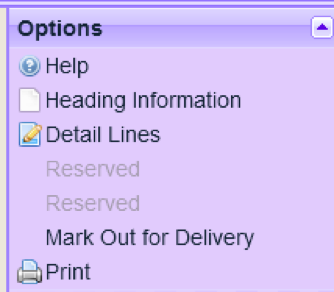
To view additional information about an order or shipment tap the menu icon in the upper right hand corner of the app, and then tap one of the items in the menu. Below we have tapped the ” Detail Lines” item to display what items are being delivered to this customer.

|
|
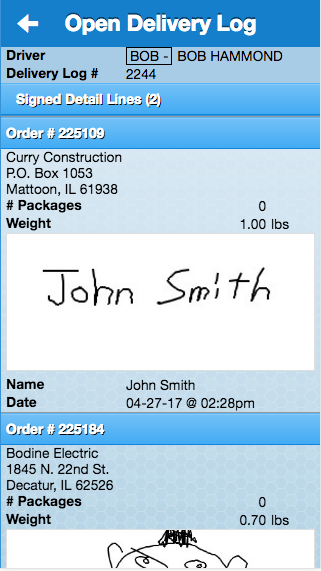
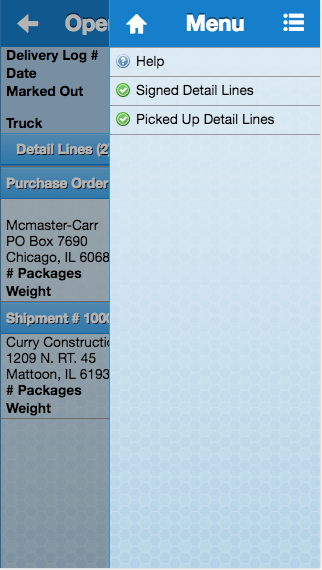
You also have the option to view a list of the signed/picked up detail lines by tapping the menu icon in the upper right hand corner on the ” Open Delivery Log” screen, and then tapping either ” Signed Detail Lines” or ” Picked Up Detail Lines“. You will then be presented with a list of items which have been picked up or delivered, including the customer’s signature.

|
|
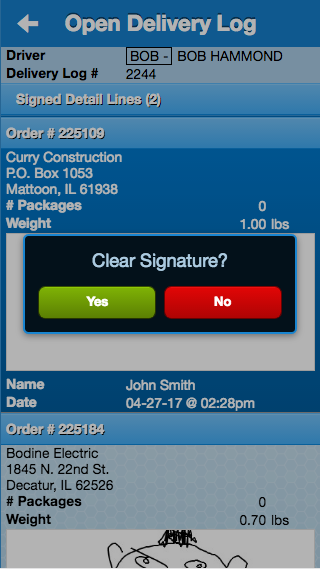
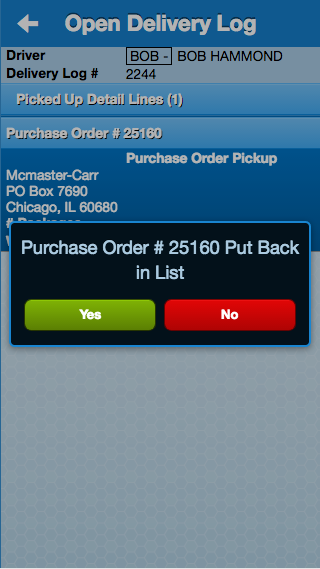
If for some reason you need to remove a customer’s signature or put a pickup back in the list, you can tap the any item in the ” Signed Detail Lines” or ” Picked Up Detail Lines” screens. You will then be prompted to confirm the action and if you tap the [ Yes] button, the item will go back into the delivery log.

|

|
Open Delivery Logs (Offline)
The offline version of ” Open Delivery Logs” allows delivery drivers to capture customer signatures and pickups without the need for an internet connection. This menu item will only appear in the ” Signature Capture” menu if you install and run the tbe4mobile app.
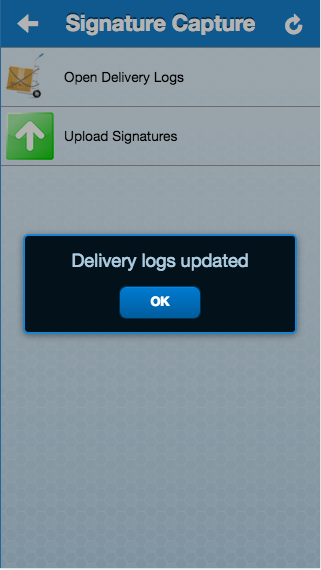
Before you can start using the ” Open Delivery Logs” functionality, you will first need to have an active internet connection on your mobile device in order to sync the delivery log information from The Business Edge to the tbe4mobile app. To sync the delivery logs tap the refresh icon in the upper right hand corner of the ” Signature Capture” screen. The mobile device will display ” Loading…” until the sync is complete, at which point you will see a message indicating that the delivery logs have been updated.

|
|
To view a list of delivery logs tap the ” Open Delivery Logs” menu item. The ” Open Delivery Logs” screen shows you who the delivery driver is and lists all the open delivery logs. You can see summary information for each log including how many signatures and pickups are needed for each log, as well as what delivery truck to use.
|

|
To view more details on a delivery log you can tap the delivery log item on the ” Open Delivery Logs” screen. The ” Open Delivery Log” screen displays a list of all the deliveries for this log. To collect signatures or mark an order as picked up, you just tap the delivery log item in the list.
If the delivery log item is a pickup, you will be prompted to confirm that you are picking up.

|
|
If you tap an item which requires a signature you will be prompted to collect a signature. To collect a signature you tap the signature area and a box will appear and ask you to ” Please sign below“.

|
|
Once your customer has given you their signature, you will need to tap the [ Save] button to save the signature. To complete the signature capture process, you need to enter the customer’s name in the ” Name” box, and tap the [ Submit] button.
Your customer’s signature data has been saved to your device and is ready for uploading to The Business Edge.
To view additional information about an order or shipment tap the menu icon in the upper right hand corner of the app, and then tap one of the items in the menu. Below we have tapped the ” Detail Lines” item to display what items are being delivered to this customer.
|

|
You also have the option to view a list of the signed/picked up detail lines by tapping the menu icon in the upper right hand corner on the ” Open Delivery Log” screen, and then tapping either ” Signed Detail Lines” or ” Picked Up Detail Lines“. You will then be presented with a list of items which have been picked up or delivered, including the customer’s signature.
|

|
If for some reason you need to remove a customer’s signature or put a pickup back in the list, you can tap the any item in the ” Signed Detail Lines” or ” Picked Up Detail Lines” screens. You will then be prompted to confirm the action and if you tap the [ Yes] button, the item will go back into the delivery log.
|
|
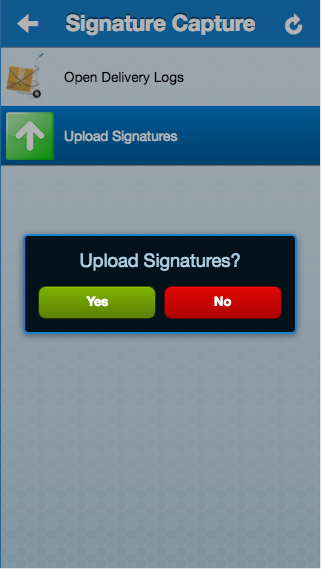
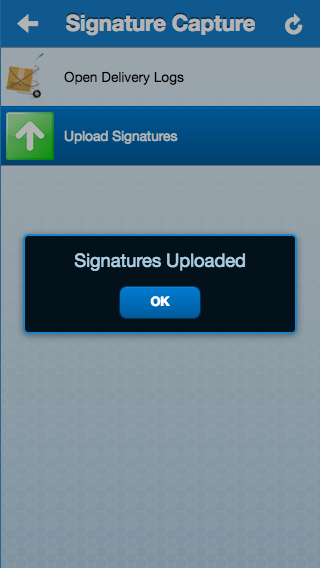
Uploading Signatures
To upload delivery logs to The Business Edge including signatures and pickup information, your mobile device will need to have an internet connection. Once your device has an internet connection you can tap the ” Upload Signatures” menu item on the ” Signature Capture” screen to begin the upload process. When all of your signatures have been uploaded to The Business Edge, you will see a ” Signatures Uploaded” message indicating all signatures on the device have been uploaded.
|
|
The final step after uploading signatures is to tap the refresh icon in the upper right hand corner of the ” Signature Capture” screen to make the app synchronize the delivery logs with The Business Edge.
Vendor Managed Inventory (VMI)
VMI Introduction
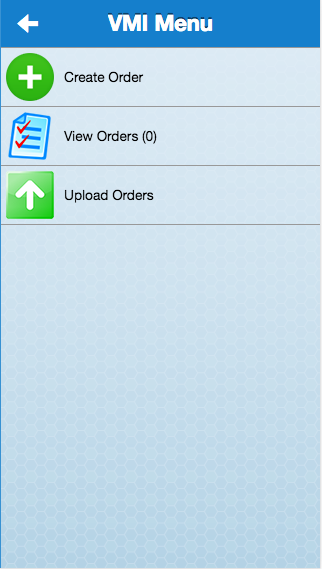
The Vendor Managed Inventory (VMI) functionality enables users to create and edit orders using mobile devices, even when no internet connection is available. The VMI system allows you to create orders by manually searching for products or by scanning barcodes using a barcode scanner or the camera in your device. Once orders have been created they can then be uploaded into The Business Edge system when an internet connection becomes available.

|
|
Enable VMI for Entity
In order for VMI to function you must enable it on the entity. You can locate this option at
9. Utilities
    10. System Administrator System
        5. System Setup
            2. Miscellaneous Set Up
                3. Entity & System Flags
                    10. Web & VMI Flags
                        3. Customer Bin System Flags
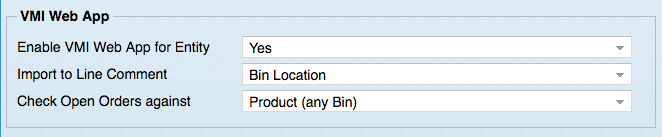
To enable VMI for the entity Change “Enable VMI Web App for Entity” to “Yes“
|
Configure VMI Options
The VMI system can be configured to operate in a variety of ways based off of flags set in the user account. The first step to configuring VMI for a user is to set the ” VMI Mobile” option to ” Yes” in the ” Enter & Edit User Permissions” screen. (refer to “Configure User accounts” section)
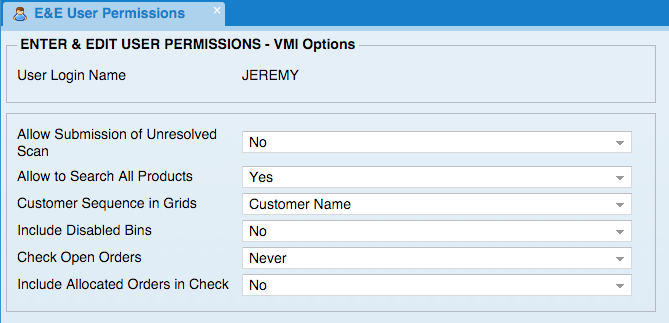
Once the ” VMI Mobile” service has been set to ” Yes“, the next screen you see will be the ” VMI Options” screen which will allow you to configure VMI to operate according to your preferences.
|
On the ” VMI Options” screen you will see a variety of options which you can configure. Below is a list of each option and a basic explanation of what each option does.
Allow Submission of Unresolved Scan
Set this option to ”
Yes” if you would like to allow the app to scan barcodes which are not recognized and add them to orders. When importing orders with unresolved scans, the Business Edge will try to map the unresolved barcode scan to a product in the system.
Set this option to ” No” if you would like to only allow submission of recognized bins and products.
Allow to Search All Products
Set this option to ”
Yes” if you would like to allow search through all your products.
Set this option to ”
No” if you would like to only allow searching of customer bins.
Customer Sequence in Grids
Set this option to ”
Customer Name” if you would like to sort customers by name.
Set this option to ”
Customer Code” if you would like to sort customers by code.
|
|
| Sort by Customer Name | Sort by Customer Code |
Include Disabled Bins
Set this option to ”
Yes” if you would like to allow disabled bins in VMI orders.
Set this option to ”
No” if you would like to only allow active bins in VMI orders.
Check Open Orders
This option is used on the ”
View Orders” screen to determine how you would like to handle open orders.
Set this option to ”
Never” if you do not want to check for open orders.
Set this option to ”
Automatic” if you would like to automatically check for open orders.
Set this option to ”
Manual” if you would like to check for open orders manually.
|
|
| Open Orders indicated in list | Open order details |
Include Allocated Orders in Check
Set this option to ”
Yes” if you would like to include allocated orders in the open orders check.
Set this option to ”
No” if you would like to ignore allocated orders in the open orders check.
|
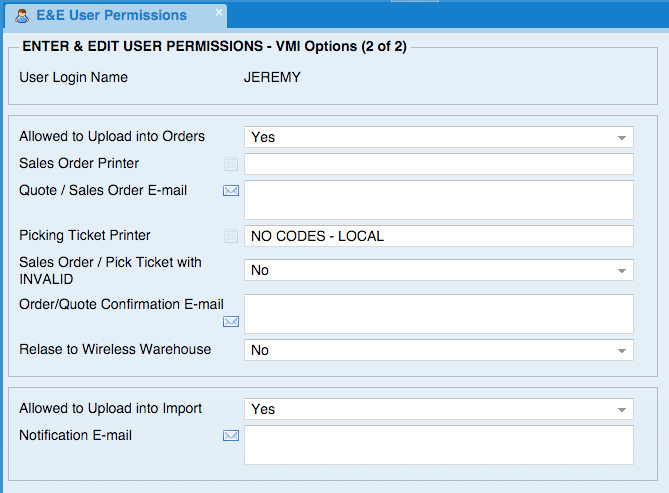
On the ” VMI Options (2 of 2)” screen you will see a variety of options which you can configure. Below is a list of each option and a basic explanation of what each option does.
Allowed to Upload into Orders – Does user have permission to use this button

Sales Order Printer: When order is uploaded, if a printer is selected, then when the user uploads the order, a sales order will be generated and print out on this printer.
Quote / Sales Order E-mail: When an order is updated, if an e-mail address(es) is entered, then either a sales order or quote will be generated and e-mailed to this address (PDF)
Picking Ticket Printer: When an order is uploaded (and it is not a quote), if a printer is selected, then the picking ticket will be generated and printed out on this printer
Sales Order / Pick Ticket with INVALID: Yes/No – If set to No then if any of the detail lines are using the “INVALID” part number, then the sales order, quote, and picking ticket will not generate and e-mail/print.
Order/Quote Confirmation E-mail: When an order is uploaded, if there is an e-mail address(es) in this field, the system will sent a notification to the e-mail that a new order has been uploaded. Simple, plain text e-mail with the order #s and basic information in it.
Release to Wireless Warehouse: Yes/No – If set to Yes, the system will release the order to the wireless warehouse.
Allowed to Upload into Import: Does the user have permission to use this button:
Notification E-mail: When a Manual Import is uploaded, if there is an e-mail address(es) in this field, the system will send a plain text e-mail with basic information about the data that is ready to be uploaded.
If you have enabled the ” Uses E-Signature Mobile” option, then you will see the following screen next where you can configure the signature list flags.
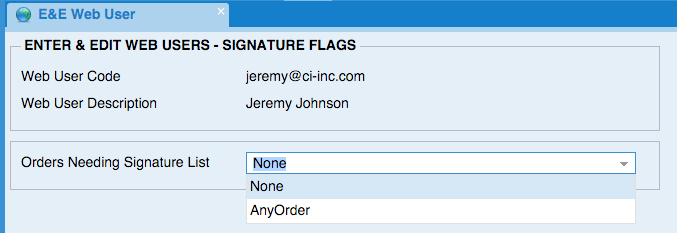
Orders Needing Signature List: Options of: None, AnyOrder, My User Only (only for regular users);
When online (or in mobile.ci-inc.com), there is a menu option: Signature Capture –> Documents Needing Signatures This interface polls the server every 30 seconds to see if anyone has marked an order to be signed for. If there is only one device to use for signatures, then this would be set to AnyOrder. If each user has their own device, then it would be set to My User Only.
There is a button in Allocate Inventory – final screen: “Acquire Signature” that puts the order into this list.
Download/Sync Data
In order to place VMI orders you must first download a list of your bins, customers, and products to your mobile device. When you tap on the ” Vendor Managed Inventory” menu item and no data has been downloaded, you will be presented with a message indicating that you must download data to your device.
|
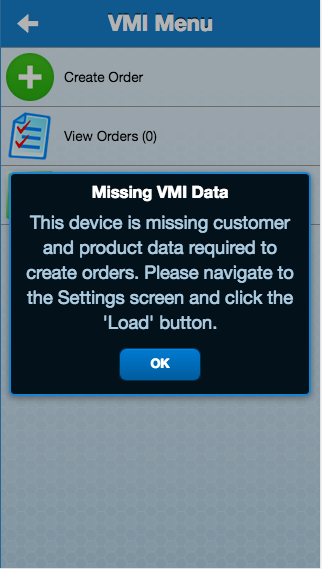
|
To download your VMI data to your device, you must navigate to the ” Settings” screen, scroll down to the ” Vendor Managed Inventory” section, and tap the [ Load] button.

|
|
When you tap the [ Load] button the status field will change to ” Loading Data…” as the data is downloaded. When the data sync is complete, the status will change to ” Ready“.
The first time you tap the [ Load] button, all the VMI data will be downloaded to the device. This process can sometimes take a few minutes depending on the amount of data that the app needs to download.
Once all the data has been downloaded, additional taps on the [ Load] button will only download any changes to the data.
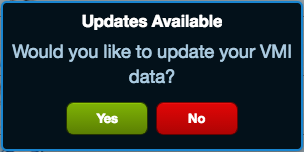
TBE Mobile will periodically check in with the server to determine if any of the VMI data has changed. If changes are detected, you will get a notification window that updates are available, and will be given the option to download the updates. To download the updates tap the [ Yes] button and the updates will be downloaded in the background.
|
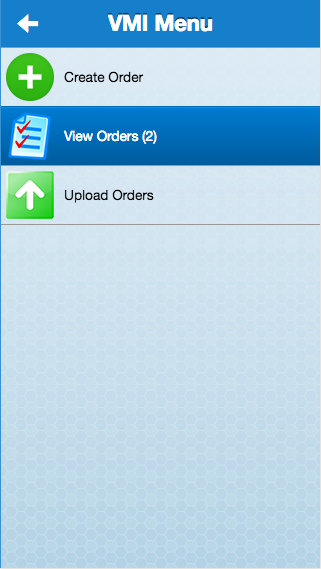
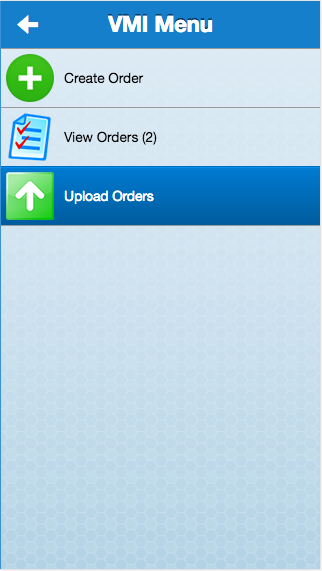
Create Order(s)
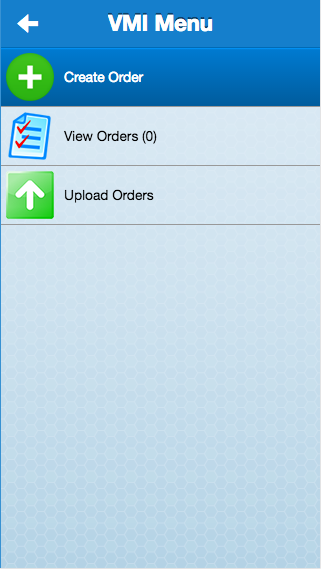
The first step in creating an order is to tap the “Create Order” item in the VMI Menu.
|
|
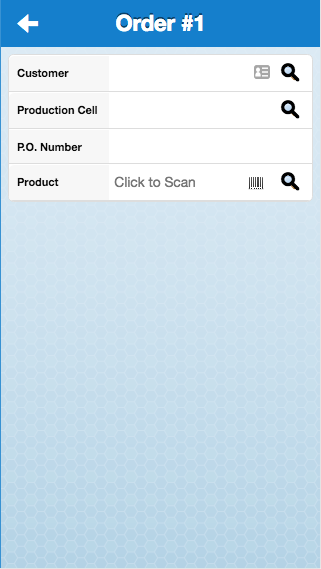
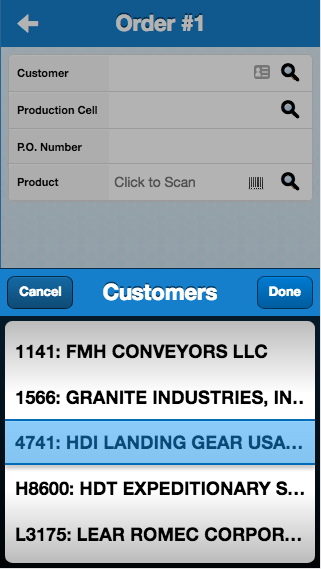
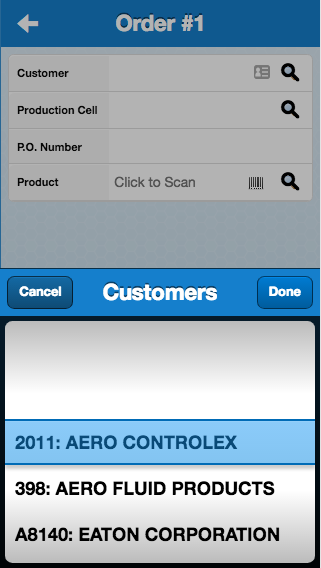
The ” Create Order” screen displays a list of fields which needs to be filled out, as well as a magnifying glass icon to the right of each field. You can tap one of the magnifying glass icon in any field to search all the possible values for that field. The search functionality also allows you to search for partial matches by entering a value to search for, and then tapping the magnifying glass icon.
|
|
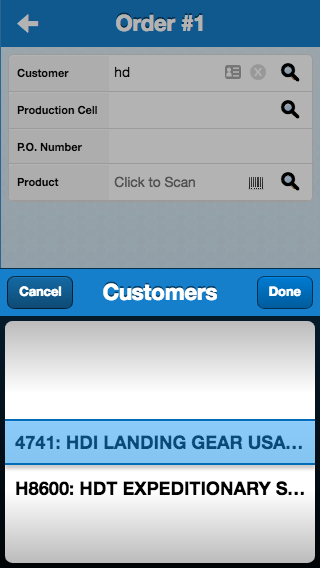
| Showing all possible values | Showing partial matches for “hd” |
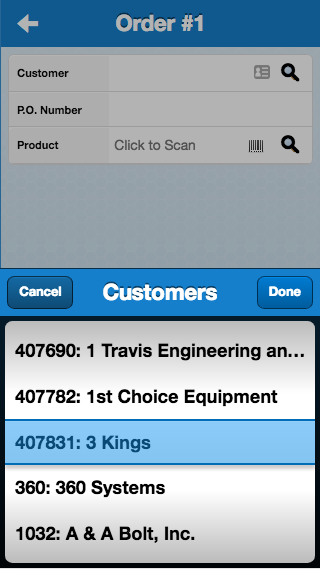
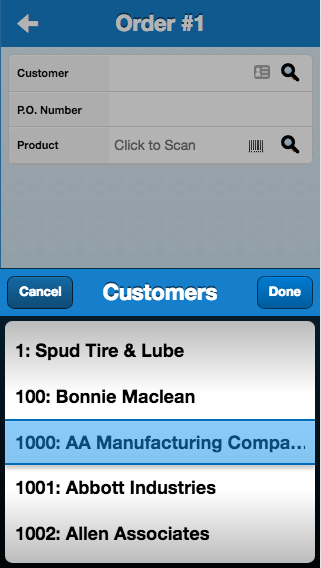
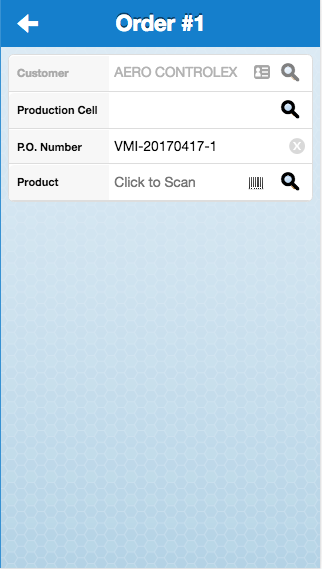
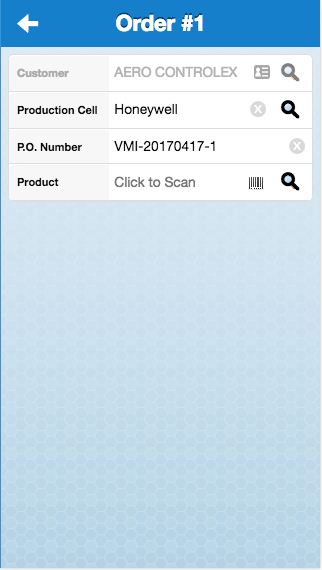
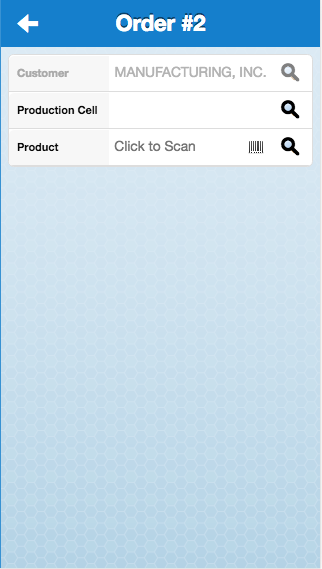
To create an order, you first need to select a customer from the list. Once a customer has been selected, the field will become disabled to prevent changing the customer.
|
|
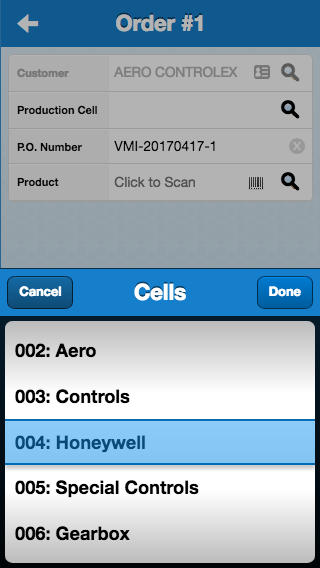
If your system is configured to use production cells the next step you will need to take is to select a production cell.
|
|
You may manually enter a ” P.O. Number” for this order. If the ” P.O. Number” field is automatically populated, that is because there is a flag on this customer which indicates the system should automatically generate a P.O. Number.
The next step is to add your first product to the order by focusing the ” Product” field, and enter the information on the product you want to add to the order. There are 3 different ways you can add items to your order
Barcode Scanner
You can scan a barcode with a usb or bluetooth scanner device to add the item to the order.
Camera Scanner
You can scan a barcode with the camera in your mobile device to add the item to the order. To use the camera in your device tap the barcode icon.
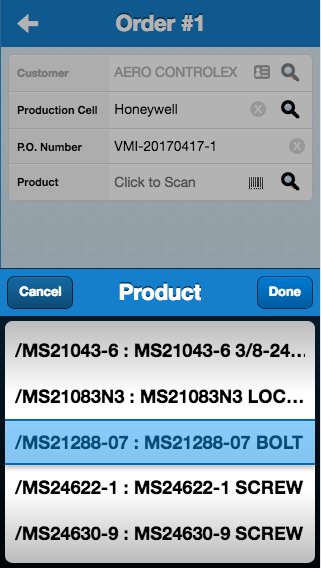
Product Search
You can tap the magnifying glass icon to bring up a full list of products, or you can enter a partial product code or product description and tap the magnifying glass icon icon to bring up a list of any products which match the search criteria.
|
|
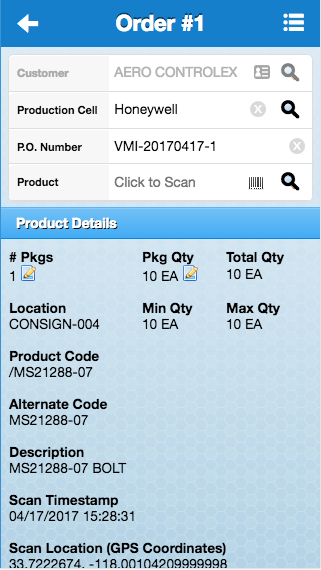
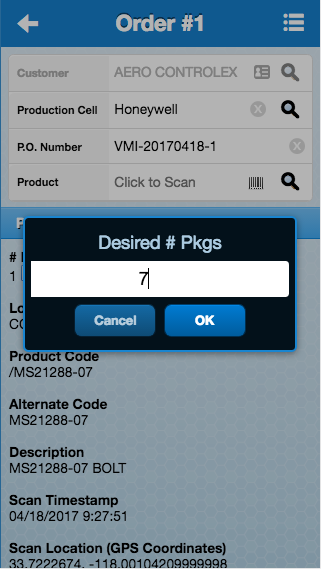
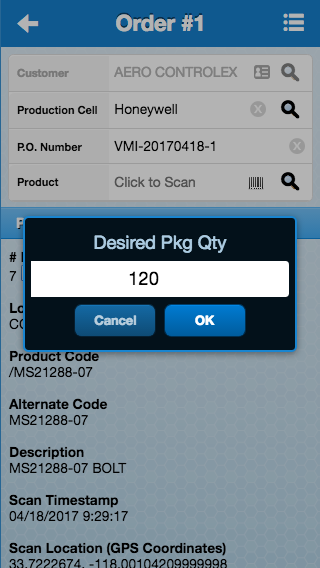
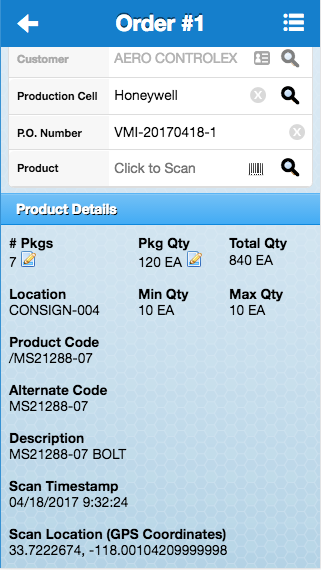
Once you have added an item to the order, the product details will appear below the search form. The product details section shows you various information about the product, as well as allows you to edit the ” # Pkgs” and the ” Pkg Qty“. To edit an item you tap on the edit icon and you will be presented with a box asking you the desired ” # Pkgs” or ” Pkg Qty“. Enter the desired amount and tap the [ OK] button to update the order.
|
|
Whenever the ” # Pkgs” or ” Pkg Qty” changes, the Product Details screen will be updated to display the new values for ” # Pkgs“, ” Pkg Qty“, as well as the total quantity.
|

|
To add additional items to your order re-focus the ” Product” field and scan a barcode or search for a product, similar to how you added the first product to the order. You can continue adding as many items to an order as you would like.
When you are done with the order tap the back arrow in the upper left hand corner to navigate back to the main ” VMI Menu“.
To create additional orders tap the ” Create Orders” item in the ” VMI Menu“, similar to how you created the first order.
Order Options
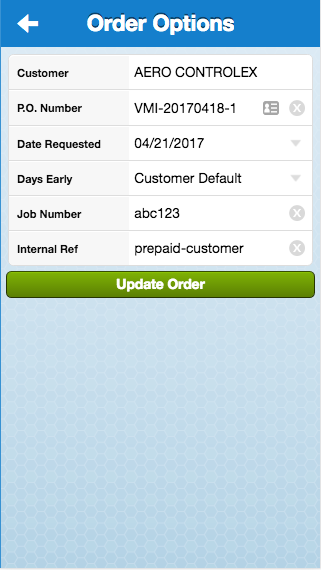
In addition to adding products to your order, you also have the option of adding some additional information via the ” Order Options” menu item. To edit the ” Order Options“, you tap the menu icon in the upper right hand corner and then tap the ” Order Options” menu item.
|
|
When you are done editing the ” Order Options” tap the [ Update Order] button and the additional information will be saved.
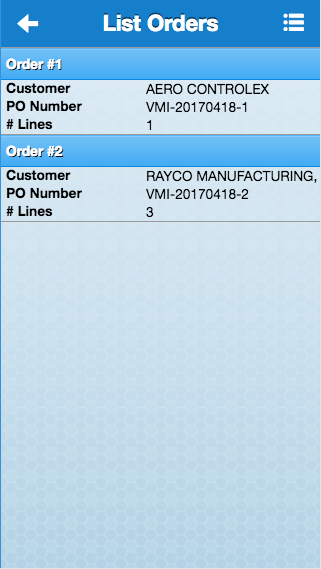
View/Edit Order(s)
To view and/or edit an order, you must first tap the ” View Orders” item in the ” VMI Menu“. You will then be presented with a list of orders that have been created, but not yet uploaded to The Business Edge.
|
|
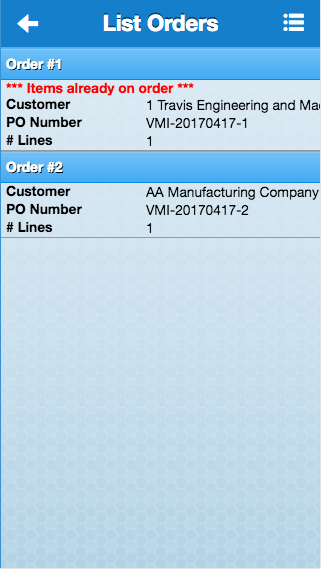
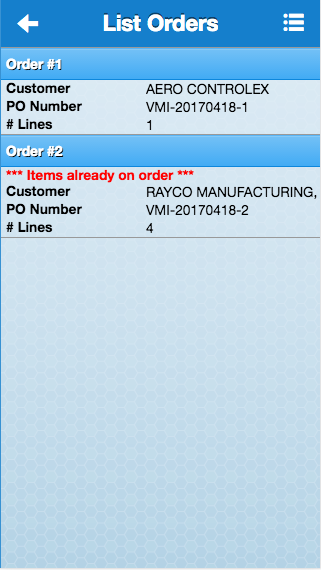
The VMI system comes with a ” Check Open Orders” feature which allows you to compare orders on your device with open orders in The Business Edge to quickly identify products which are already on order. If you have the ” Check Open Orders” option set to ” Automatic“, then the app will automatically check for open orders when you view the ” List Orders” screen. You can also manually check for orders by tapping the menu icon in the upper right hand corner and then tapping the ” Check Open Orders” menu item.
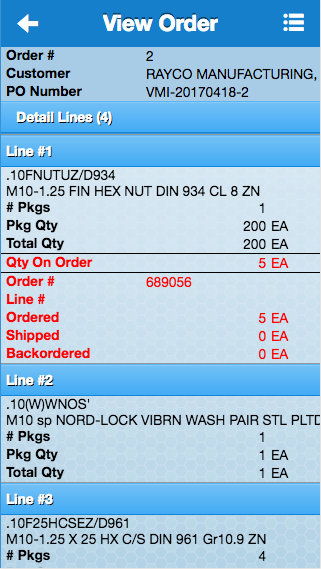
When the app detects that an item is already on an open order the ” List Orders” screen will be updated to clearly indicate which orders have items that are already on other orders. To view the specific items that are already on order, you can tap the order line to view the order information.
|
|
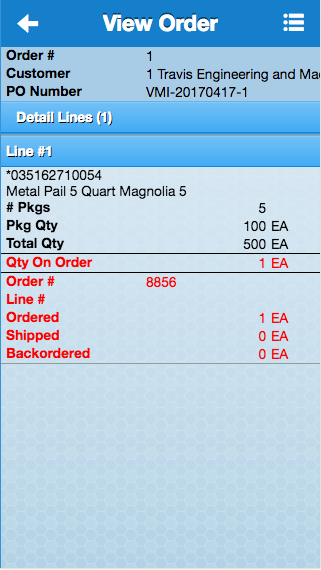
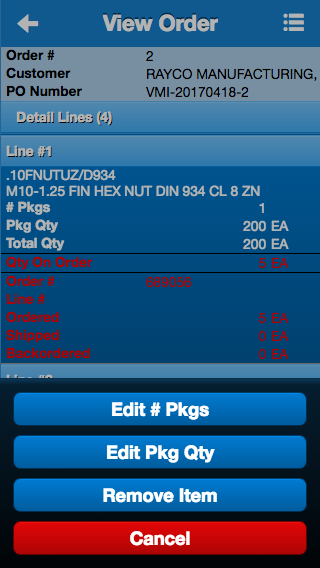
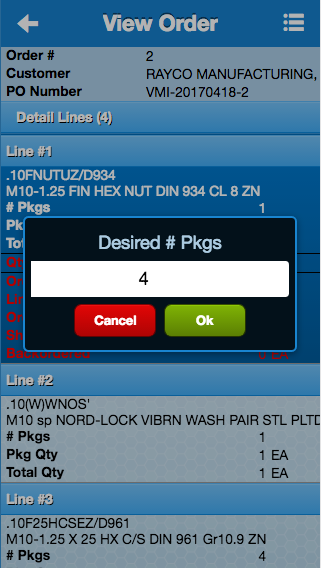
The ” View Order” screen shows you the basic order information as well as a detailed list of your line items. To edit the line item you can tap the line and a menu will appear giving you options including the ability to edit ” # Pkgs” and ” Pkg Qty“, as well as the ability to remove the item from your cart. To edit the ” #Pkgs” or ” Pkg Qty“, you can tap the edit button and you will be given the option to edit the line item details. When you are done editing the line item tap [ Ok] and the line will be updated as desired. To remove an item from your order tap on the detail line and then tap the [ Remove Item] button.
|
|
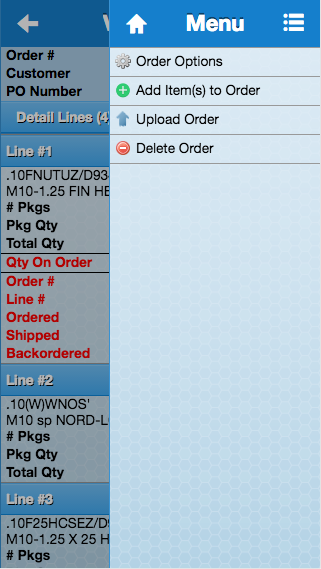
In addition to editing and removing items from your order, there are some additional options available on the ” View Order” screen which can be accessed by tapping the menu icon in the upper right hand corner.
|
|
| View Order Menu | “Add To Order” screen |
In the ” View Order” menu you will see the following options:
Order Options
This item will allow you to edit additional information associated with your order such as requested date, internal reference number, etc.
Add Item(s) to Order
This item allows you to add additional items to an existing order using the same process as when you first created the order. You can search for items manually, or scan them to add them to your order.
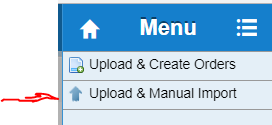
Upload Order
This item allows you to upload a single order to the server rather than uploading all pending orders. When you tap this menu item you will be taken to the ”
Upload Orders” screen where you can choose to ”
Upload & Create Order” or ”
Upload & Manual Import”
Delete Order
This item will remove the current order and all of the detail lines for the order from the device.
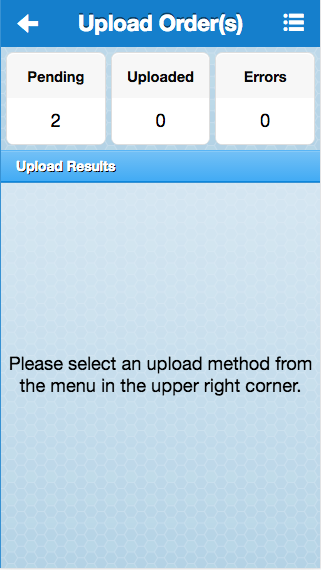
Upload Order(s)
To upload orders to The Business Edge from your mobile device, you will need to navigate to the ” VMI Menu” and tap the ” Upload Orders” menu item. The ” Upload Order(s)” screen will display the count of how many orders are ” Pending“.
|
|
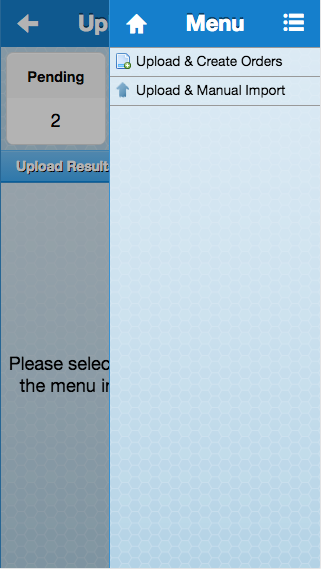
Once you are on the ” Upload Order(s)” screen you will need to tap the menu icon in the upper right corner of the app to display a list of options for uploading the orders. Depending on how your system is configured, you could see ” Upload & Create Orders” and/or ” Upload & Manual Import” options in the menu.
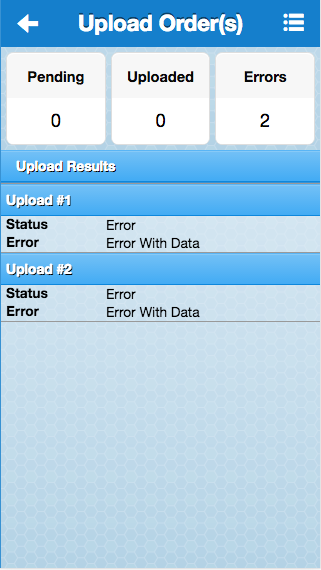
To upload the orders you tap one of the upload options and the app will upload your orders. If The Business Edge detects any errors during the order upload process, you will be notified of the errors.
|
|
When the app is done uploading all of your orders the screen will be updated to display the status of each order.
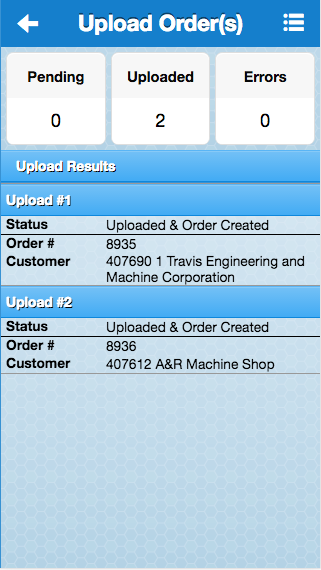
If you choose the ” Upload & Create Orders” option you should see a list of the uploaded orders as well as the order # that was generated for each order. You should now be able to go into The Business Edge and lookup the orders using the Order #.
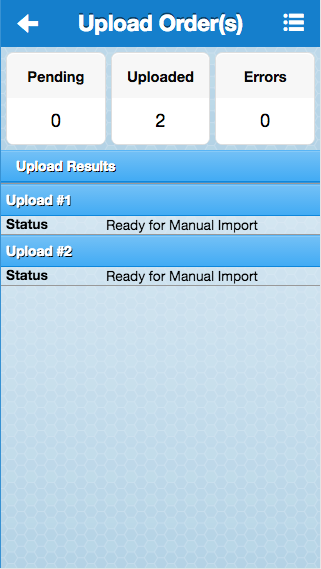
If you choose the ” Upload & Manual Import” option, you should see a list of the uploaded orders and a status message for each indicating that the order is ready for manual import.
|
|
Manual Import
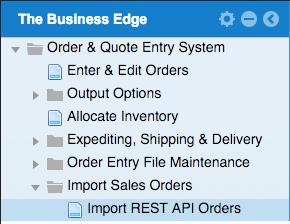
When you choose the ” Upload & Manual Import” option in the app, your orders are uploaded to a queue/waiting area within The Business Edge where you can review the uploaded orders, test the order data to verify it is valid, and make any additional changes before actually creating the orders in the system. To review orders which are waiting for manual import, you can navigate to the ” Import REST API Orders” menu option which can be found at :
  1. Order & Quote Entry System
     7. Import Orders
       5. Import REST API Orders
|
When you run the ” Import REST API Orders” menu option, you will be presented with a screen which displays a list of the uploaded orders which are waiting in the queue.
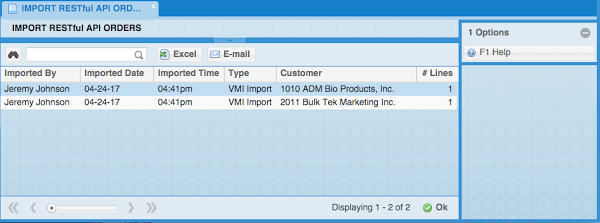
|
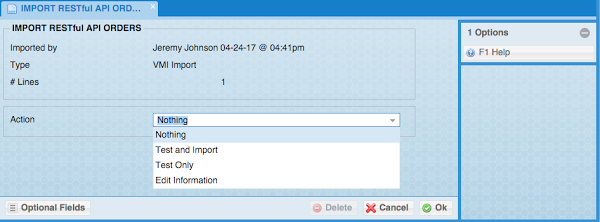
To view/edit the information for an order, you can select the order you want to view and press ” ENTER” or click the [ Ok] button, and you will be presented with a screen with the basic order details, as well as a list of actions you can perform on the order
|
The actions you can perform on an order in the queue are:
Nothing
Take no action and return to the list of orders.
Test Only
Test the order to verify that all the information is valid (customer, part #, etc).
Test and Import
Test the order to verify that all the information is valid (customer, part #, etc). If no errors are found, the the order will be imported into The Business Edge.
Edit Information
This option allows you to edit the order information. To delete an order from the queue, you can tap the [
Delete] button when editing the order.
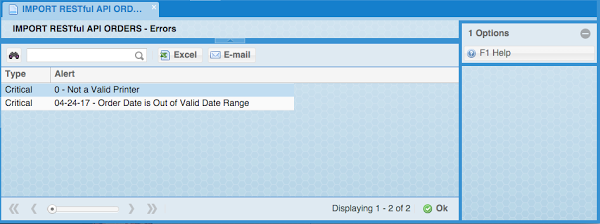
When running ” Test Only” or ” Test & Import“, if any errors are found with the order information, you will be presented with a list of the errors for the order. You can then use the ” Edit Information” option to make any necessary changes to the order.
|